Showing posts with label flying geese. Show all posts

Tuesday, February 4, 2020

Show Me Something {with Triangles}

February's theme for Show Me Something with Sarah is triangles!


Here are the three projects I am adding to Sarah's link up:

1. Faceted Churn Dash wall hanging -- This scrappy quilt is lots and lots and lots of little half square triangles!


2. Pink Stars baby quilt -- I made this quilt as an Island Batik Ambassador challenge last year. There's only one square in each block -- the rest of the piecing is all triangles!


3. Good Fortune quilt -- this was the Bonnie Hunter mystery in 2018, featuring quite a few triangles!


I hope you check out what everyone has linked up and link up a few of your own blog posts too!

Tuesday, January 28, 2020

Clue #7, #8 Progress and a Test Block {Frolic Mystery Quilt}

The good thing about being behind on Frolic is that I can see how other people's quilts are coming together! I have been enjoying seeing all of the blocks people are putting together on Instagram and I am very jealous of those who have had the time/patience/ability to get their quilt tops finished!

The bad thing about being behind is that it seems like somewhat of an insurmountable task! I'm making some progress, most certainly. I've found that it is kind of hard to get to a stopping point with this project because I just want to keep going with the units.

I have *technically* finished all of the units for Clue #8 per the directions but haven't sorted my units into block groupings. I made all of the aqua/blue/coral flying geese and trimmed them.


I also managed to finish up the coral/navy HSTs which will be used to make the pinwheel centers of the blocks. I haven't gotten many trimmed.


I have trimmed a few HSTs though -- because I put together a test block!


First and foremost, WOW! As complicated as the directions seemed to be at times, I have found everything is coming together quite nicely! I have a tentative plan on modifying my quilt to be slightly larger, but for now, I am going to make all of my full blocks using the navy fabrics before moving onto my dark teal blocks. I will need to go back and make the dark teal/coral/aqua flying geese and dark teal/coral HSTs, but for now, I need a mental break from making units.

I also have quite a bit of cutting to do, particularly of my background fabric, to be able to put together blocks and sashing. I wish there was more strip piecing I could do going forward, but it will be a one-block-at-a-time thing to finish this quilt.

Please pop back in on Thursday as I will be sharing all of the goodies in my newest Island Batik Amabassador box!

Sharing at Needle and Thread Thursday!

Friday, January 17, 2020

Clue #4, #7, #8 Progress {Frolic Mystery Quilt}

After a long delay, I have finally finished Clue #4 for my Frolic mystery quilt! While the final reveal came out today, I am not as behind as I thought I might be.

To finish up Clue #4, I made all of the necessary sets of HSTs in navy, dark teal, and aqua.

I split up my aquas so that I used half of the different prints to make the aqua/navy HSTs and the other half of the prints to make the aqua/dark teal HSTs.


The left and center aquas are from my Pineapple Log Cabin quilt, the gingham check is a fat quarter I pulled out of a bundle, and the dot is from my April Showers quilt.


The umbrella print and raindrop print are from my April Showers quilt, the pearl chain dot is my Pineapple Log Cabin quilt, and the bubble dot print is a fat quarter of unknown origin.

(The beautiful print I used as my background is actually the back of one of my Wanderlust placemats.)

I also finished up the cutting for Clue #7.


But I decided that I needed a break from HSTs (which is what I would be making in Clue #7) and I decided that I wanted to skip to making more flying geese in Clue #8 instead! I am part of the way through sewing the blue triangles to one side of the units.


Some of my predictions about the quilt were very wrong, and some were right! I definitely like the blocks and the setting, but I am not necessarily in love with the pieced borders. I am going to think about actually making the center of my quilt LARGER and eliminating the pieced borders. I have lots of options, and I really love the main block of the quilt!

If you are Frolic-ing, what do you think of the reveal? Is it what you predicted? I predicted a quilt on point however I did not think we would have sashing.

Have a lovely weekend!

Monday, January 13, 2020

Clue #4, #6, #7 Progress {Frolic Mystery Quilt}

Slowly but surely I am making tiny bits of progress on my Frolic mystery quilt. I was able to dig deep in my stash to find two fat quarters to finish the cutting for Clue #4!


Yay for not having to go to the store and buy more fabric! I started drawing lines on the back of the small squares to pair each with a navy or dark teal small square to make the half-square triangles for Clue #4 and this will be the next thing I sew. Most of my aqua fabrics are left over from my April Shower Medallion quilt and my Pineapple Log Cabin quilt. 

For Clue #6, I am making part of my flying geese using my navy fabric and part using my dark teal fabrics. I started off making the navy fabric geese with yellow scraps for the background triangles and had shown some of the sewn but untrimmed geese in my last Frolic post. 


I have really, really used up my yellow scraps -- so much so that the yellow batik in the upper right hand corner was a fat quarter hanging around in my stash from long, long ago that I originally didn't think I would end up using for this quilt. Some of these fabrics were also used in my On Ringo Lake quilt, too. 

For the dark teal set of geese, I am using a single yellow print fabric -- something I had bought on clearance years and years ago, which I think looks really lovely with the coral dot print. I used three of my dark teal prints for these flying geese.


Making and trimming these geese went much faster than the batch that I made with the navy and scrappy yellow fabrics!


Now I am officially *done* with Clue #6! I also started the cutting for Clue #7:


I still have a pile of coral squares to cut for this step, that will be paired with the navy or dark teal to make half-square triangles and pinwheels or used to make more flying geese in Clue #8.

While a lot of people are itching for another clue to be released, I am happy that we haven't had any additional bonus clues! If I could get through finally finishing Clue #4 and making a dent in Clue #7 before Friday, I would be really, really proud of myself.

Are you Frolicking? How is your progress? I applaud those of you that decided to do half sized quilts this time around because sometimes I am regretting going full-scale for this one!

Sharing at What I Made Monday and Oh Scrap!

Wednesday, December 18, 2019

Mosaic Mystery Quilt {Gaggle of Gooses}

I guess that this week just happens to be "mystery quilt catch up week" before my holiday travels!

I was also able to squeeze in the December clues for the Mosaic Mystery Quilt. The directions for December are actually a conglomeration of a few different flying geese and flying geese-esque units.


There are right and left facing half flying geese in two different color combinations, three sets of full flying geese units, and a few half square triangles. 

Because I am using fat quarter cuts for my Fabric B and Fabric C choices (burgundies and pinks), I made my half geese in matching pairs. We'll see if the way that I divvied up my fabric choices with my units will work well in the final quilt design. If I decide that I need to make additional or replacement units, I have extra fabric of all four of the pink fabrics I used. I might not have quite as much extra burgundy to work with, but I will make it work.

Back goes all of my units and fabrics into their rather large project bag -- in January we will start making blocks and assembling the quilt!

Friday, February 15, 2019

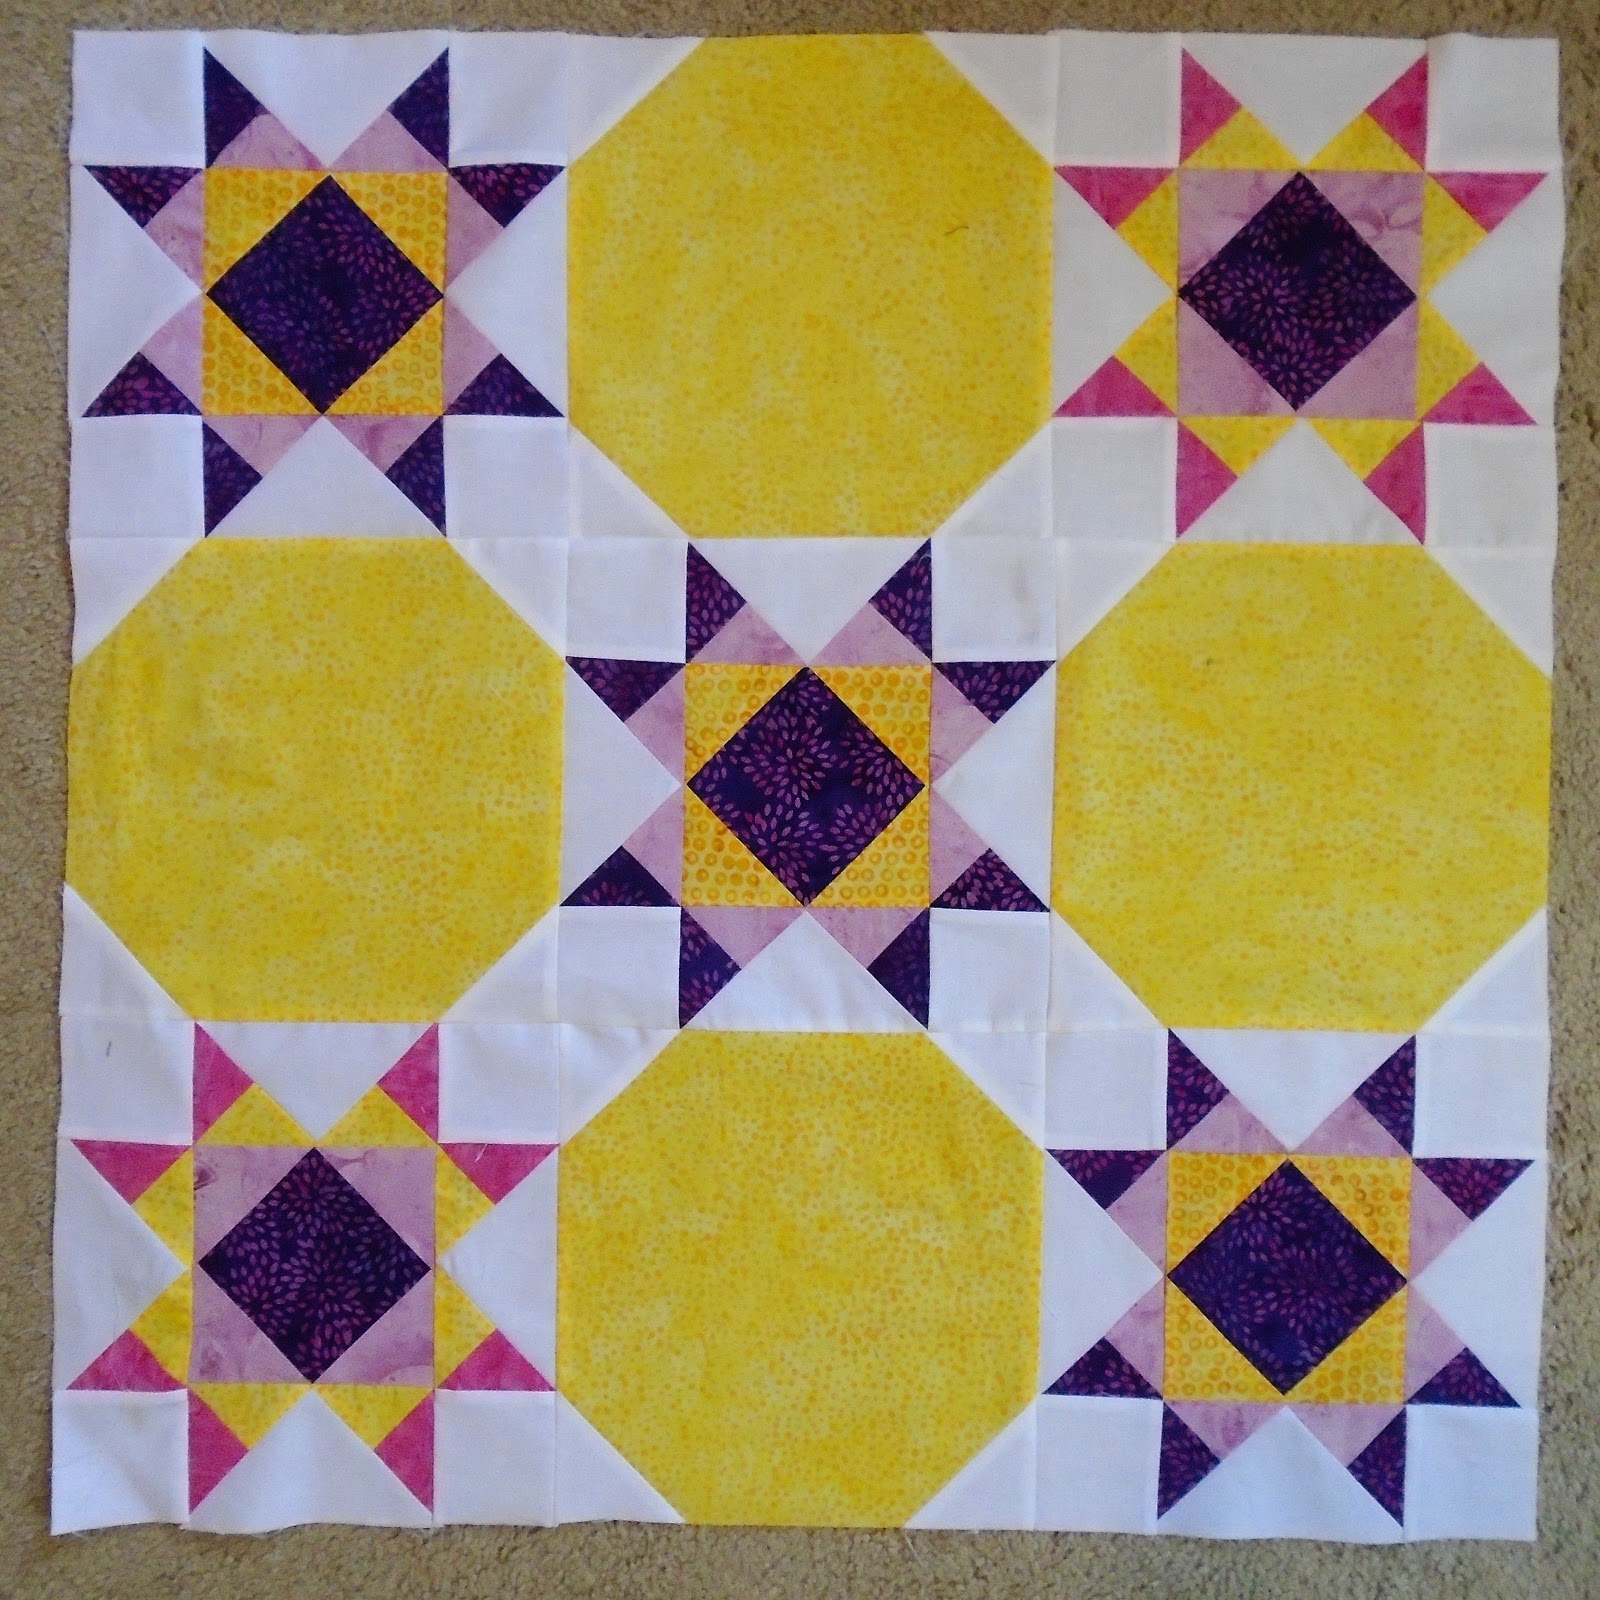
Stars at Play Mini {Under Construction}

Now that I finished my Good Fortune quilt top, it's back to focusing on things with deadlines -- but that doesn't mean that those projects aren't fun!

While working on finishing up the last of the unit construction for Good Fortune, I was also working on the unit and block construction for my Island Batik Ambassador mini quilt project for February.


Last week, I had quite a few pieces and parts made for the Missouri Star block portion of the mini quilt. The pattern calls for five star blocks and I am very happy with the final color selections I made for the blocks.


Isn't that background fabric gorgeous? It pulls in all of the colors from the block.

Next up was making the snowball blocks -- these four blocks with the five star blocks make up the center of the quilt.


These rectangles are used in the pieced border.


Now the top of this mini quilt is complete and ready for quilting!


What color(s) do you think that I should use for quilting? I've pulled four different colors of Aurifil from my stash.


I'm leaning towards the purple or the aqua -- what do you think?

Sharing at Linky Tuesday!

Friday, September 28, 2018

Radiant Jewel {Four Patch Piles}

I've had a little bit of a short attention span this week, so I've been working on the various units that make up the star blocks in my Radiant Jewel quilt.

All of my flying geese units are pressed and trimmed.


For the center of the blocks, the directions tell you to make randomly patched four-patches out of 2.5" squares. I decided that I would strip piece mine using one of the black prints and the cream/gold print.


I also set aside the 2.5" squares I'll need for the border units.

I also started working on the very, very many small four patches that are in the star blocks and the border units. The quilt requires 172 of these four patches that will finish at 2" in the quilt!


While I still need to make about 100 more of these tiny four patches, I laid out my first star block to see what it will look like. The vast majority of the tiny four patches are used in the pieced border.


This has been a good project to work on this week since it's so fun and the fabrics are so beautiful. This weekend I need to get myself in gear to finish at least something or work on something with a real deadline rather than just fun things for myself.

Friday, July 13, 2018

Fancy Flying Geese {Tutorial and Block Progress}

My July Island Batik Ambassador project is moving along nicely! Today I'm going to talk about the "fancy flying geese" used to make the Missouri Stars for this quilt.

But first, here are my stitch and flip square in a square units for the centers of my five Missouri Star blocks:


Most Missouri Star tutorials will have you individually piece the little triangles and the background for the "star point" sections of the blocks. The method that I use combines half square triangles with the fast flying geese method to avoid tiny piecing and bias stretching.

I originally came up with this idea when I wrote the tutorial for a 12" Missouri Star block for my Quilter's Choice QAL in 2014. Replacing squares with pieced HSTs provides you a fun way to make your flying geese units more interesting.

Since these blocks are 9" finished, my squares are scaled down from my original directions.

For four (4) Fancy Flying Geese for a 9" finished (9.5" unfinished) block:
One (1) 5 3/4" background fabric square
Two (2) 3 3/4" focal fabric squares in color A
Two (2) 3 3/4" focal fabric squares in color B

Combine your A and B focal fabric squares to make four (4) A/B half-square triangles. Draw diagonals on the back of your B squares, layer each right sides together with your A squares, stitch 1/4" from each side of the line, cut apart on the diagonal line, and press. Trim these units to 3 1/8".

I'm making two colorways of star blocks so I made two colorways of HSTs for my fancy flying geese:


After trimming, draw diagonal lines on the back of each HST perpendicular to the seam. Layer two HSTs atop your background square with the same color of the HSTs at each corner and at the center.


Sew 1/4" from each side of the drawn diagonal, cut apart on the diagonal line, and press toward your half-HSTs.


Repeat with the remaining two HSTs atop your half-way-completed goose units. Cut apart on the diagonal line, and press toward the half-HSTs for four (4) complete Fancy Flying Geese units.


This method can be adapted for any size flying geese -- just cut the squares for your HSTs 1/2" or 5/8" larger than what would be needed for the fast flying geese method.

Here's my first Missouri Star block:


Here's four out of the five together:


And here's the center of my quilt all together! 


Now I need to work on the pieced borders and think about how to quilt this baby quilt! I'll need to grab some flannel for backing as well! As always a big thank you to Island Batik for allowing me to participate in their Ambassador program and providing me with these fun batiks to create with!

Monday, April 23, 2018

Blocked Rainbow QAL {Week #4 - Green Sawtooth Stars}

The 2018 quilt along is now over and the entire pattern is available as a single PDF pattern on Etsy and Craftsy.

We're more than halfway done making our blocks for this quilt! We'll be making 10 or fewer blocks from this week on!


This week we are making our green sawtooth stars. We'll be using the fast flying geese method again this week to make smaller units for our stars.

Here are my blocks:


I used three different greens this time around. If you're making a super scrappy version of the quilt, mix up your different fabrics while you're working on your flying geese so that your star points could all be different for a single star! As a general helpful note, when working on scrappy projects, cut your largest pieces first followed by your smaller pieces -- I typically do this for all of my cutting so that I am able to cut the smaller pieces and parts from the scraps of larger cuts.

The winner of last week's pattern is Susan! Check out her great yellow geese!


This week's give away is sponsored by Terri from Lizard Creek Quilting! A little about Terri:

Terri has been quilting for over 25 years, longarm quilting for 10 years and for the last 2 years has added pattern design to the mix. Many of her quilts have ribboned in national and international quilt shows. Many quilt designs have been published in magazines--Quiltmaker, McCalls Quilting, Fons and Porter, and Quilter's World. In 2016 she won the AccuQuilt Barn Quilt design contest--and had her winning block displayed on their warehouse/office as a 17 foot barn quilt. She has had the pleasure of being an Island Batik Ambassador for the last 2 years. She lives in NW Iowa on a farm with her husband where they raise pigs!


Make sure to share your blocks in the Facebook group or on Instagram with the hashtag #BlockedRainbowQAL to be entered to win!

Sharing at Linky Tuesday!

Schedule:
March 19 - Introduction, Yardage Requirements, Kona Sale with HBD
March 26 - Sponsors, Background Spacer cutting, Color Suggestions
April 2- Red Pinwheels
April 9 - Orange Churn Dashes
April 16 - Yellow Flying Geese
April 23 - Green Sawtooth Stars <-- That's today!
April 30 - Blue Bowties
May 7 - Purple Bear Paws
May 14 - Catch up week/Mother's Day
May 21 - Setting directions
May 28 - Catch up week/Memorial Day
June 4 - Finished Quilt Top Parade/Link Up

Monday, April 16, 2018

Blocked Rainbow QAL {Week #3 - Yellow Flying Geese}

The 2018 quilt along is now over and the entire pattern is available as a single PDF pattern on Etsy and Craftsy.

It's already week #3! Let's get crackin' on some flying geese!


This week's block is a pair of flying geese. We'll be making fast flying geese, so each set of four geese will make two blocks! This should be a relatively quick week!

Here are my blocks:


You can use any method your heart desires to make your flying geese if the Fast Flying Geese method doesn't work with your current scrap collection. If you're an Easy Angle Ruler kind of person, check out this tutorial from Bonnie Hunter. If you'd rather use the stitch and flip method, check out this page from Connecting Threads that shows both the Fast Flying Geese method and the stitch and flip method.

Remember that if you change which method you plan to use to make your geese you'll need to adjust the cutting directions from my instructions so decide which method you'd like to use first before you start cutting. Regardless of which method you choose, you'll need a total of 24 flying geese in the appropriate size.

Our winner from last week is Ramona! Check out her beautiful churn dashes! Way to go!


This week's giveaway sponsor is Sharon from Yellow Cat Designs! About Sharon:

Sharon lives in Lee Summit, Missouri and is retired -- but somehow she's busier now than when she worked full time! She is a second year Island Batik Ambassador and her designs can be found at www.yellowcatquiltdesigns.com as well as in Quiltmaker, McCall's Quilting, Modern Quilts Unlimited, and in the Moda Bake Shop.


Make sure to post in the Facebook group or use the hashtag #BlockedRainbowQAL to be entered to win! Sharing at Linky Tuesday!

Today also kicks off the Stash Statement blog hop celebrating Kelly's new book! Click on over to her blog to read all about the cover quilt and enter to win a copy of the book for yourself!

Schedule:
March 19 - Introduction, Yardage Requirements, Kona Sale with HBD
March 26 - Sponsors, Background Spacer cutting, Color Suggestions
April 2- Red Pinwheels
April 9 - Orange Churn Dashes
April 16 - Yellow Flying Geese <-- That's today!
April 23 - Green Sawtooth Stars
April 30 - Blue Bowties
May 7 - Purple Bear Paws
May 14 - Catch up week/Mother's Day
May 21 - Setting directions
May 28 - Catch up week/Memorial Day
June 4 - Finished Quilt Top Parade/Link Up

Monday, January 8, 2018

On Ringo Lake {Clues #5 and #6}

While the big reveal has taken place, I'm still trudging along with the clues for On Ringo Lake!

With our holiday travels, we were already in Ohio when Clue #5 was released on the 22nd and I didn't take any of my fabrics or tools with me. I did however dig through my mom's scrap bins once we were in Michigan and find some fabrics to add to my On Ringo Lake fabrics.


I did all of the orange and black cutting for Clue #5 on Christmas Day, and did the cutting for Clue #6 on December 29th, but wasn't able to start any of the sewing until this weekend.


I did Clue #6 first, adding the triangles to Clue #4. I still need to trim the dog ears but I am loving how bright these units turned out!


It seemed like Clue #5 went faster than the previous batch of geese that I had made in Clue #2. I trimmed all of these units while we watched football and the Golden Globes last night. Either way, I am now complete through Clue #6!


My goal for this week is to get the goose pairs sewn together for Clue #7 in the evenings so that I can put together my blocks for Clue #8 this coming weekend! I will need to go back and make a few extra units for the sashing and setting, but I believe that I have enough of the necessary units to make the blocks themselves. My version will be 25 blocks on point and end up somewhere around 60 inches square, I estimate.

Check out everyone's ORL updates on the Quiltville blog! Also sharing at Oh Scrap!

Monday, October 16, 2017

Faceted Friendship Star {Flying Geese Border}

It's time for the pieced border on my Faceted Friendship Star! This is where we're really getting into the "Creative Borders and Binding" theme for our Island Batik Ambassador projects!


Instead of doing a half-square triangle border for this quilt, I decided to make flying geese (with a few HSTs thrown in for good measure, of course) to build a chevron border on my Faceted Friendship Star.


Working with 2.5 inch strips, I decided to use the 2.5 inch squares for my "small squares" and 4.25 inch squares of background as the "large squares" to make all of the fast flying geese for my chevron border. This involved a lot of chain piecing:


...and some football too! Followed by a lot of trimming.

I also needed to make 12 HSTs in addition to my 80 flying geese to make the pieced border work. I randomly pieced the four small squares with each background square so that it would mimic the random HSTs in the friendship star.

Here's a picture of the first side of the border ready to go on:


This is two rows of flying geese/HSTs units. The top/outer row is 10 flying geese units, the bottom/inner row is 9 flying geese units with a HST on each end. The top row has the geese pointing in and the bottom row has the geese pointing out.

I added the border pieces to the top and bottom of the quilt first.


The side borders are slightly longer, as you might expect! The outer row has 10 flying geese and a background square and HST on each end. The inner row has 11 flying geese with a HST on each end.


With the units arranged in this way, you end up with a continuous chevron border that looks like you've made it from HSTs, but is actually made of flying geese -- with a lot less piecing and bulk!

Here's the final quilt top:


Now to quilt and bind this quilt! It's currently 36.5 inches square and I am excited to start working on finishing it!

Sharing at Linky Tuesday!

Get the entire Faceted pattern collection on Payhip: