Tuesday, January 30, 2018

Magnolia Mystery Quilt {Finished Top}

After thinking about the quilt some more and listening to your feedback on my post last week, I decided to go ahead and add sashing to my Magnolia mystery quilt.

Since all of the piecing within the quilt is done with 2.5" strips and squares, I thought it would be most cohesive to have 2.5" sashings. Putting together the top with sashings, cornerstones, and setting triangles was actually a quick process!


With these modifications, my quilt measured 45 inches across and 70 inches long. I cut 7.5 inch strips for the sides of the quilt and don't plan to add anything else to the top or bottom.

Now my quilt is finished and I need to start plotting what to use for backing! I already know that I want to bind this in aqua.


I don't think I'll be quilting this before the deadline to submit quilts and tops for the final quilt parade, but I'm glad to shift this into the "finished top" category!

Ps. We now have a Honey, Bunny, and Doll FACEBOOK GROUP! Join in to see an early preview of our upcoming quilt along!

Sharing at Let's Bee Social!

Friday, January 26, 2018

Rainbow Farmer's Wife Quilt {Finished}

In 2016, my Rainbow Scrap Challenge project was to make blocks every month for a Farmer's Wife quilt. I made about a dozen blocks in each color over the course of the year and finished up the top at the end of last year. I used foundation piecing rather than hand piecing and templates.


The top was twin sized and I had it pantograph quilted with a loopy design once I finally decided on and purchased fabric for the backing. I picked it up in Michigan over Christmas with my also-quilted Gathering quilt (hopefully also being finished soon!). 

I trimmed the quilt and saved the big chunks of backing for the binding. I decided to hand stitch the binding to the back since we have spent a lot of time watching movies lately! 

Here it is all finished and ready for snuggling!


The backing and binding are a Michael Miller Chevron print. I wanted some sort of print for the backing, but also wanted something that wouldn't detract from the quite busy top. I thought this print was a good choice and I was very happy to have enough of it to use for the binding as well.


I think that the simple quilting motif is a great choice for this quilt.


Quilt stats:
Name: Rainbow Farmer's Wife
Size: 70 x 90 inches
Quilting: "Raindrops" pantograph
Started: January 2016
Finished: January 2018


Sharing at Finish it up Friday and Scrap Happy Saturday!

Ps. We now have a Honey, Bunny, and Doll FACEBOOK GROUP! Join in to see an early preview of our upcoming quilt along!

Wednesday, January 24, 2018

Magnolia Mystery Quilt {Blocks and Layout}

While the final directions for the Magnolia mystery quilt came out in early December, deadlines and On Ringo Lake have delayed me from getting these blocks put together!

My blocks for my throw sized quilt came together very quickly and easily.


We also had to make four half blocks. These will need to be trimmed but I'm not planning to do that until final assembly.


Here are all of my blocks laid out together in Cheryl's design.


I'm very happy with the block layout and orientation of the original design, but I'm considering adding a skinny sashing between my rows so that the individual blocks stand out. That disrupts the secondary pattern of the stars created where the "leaves" come together, so I'm not sure what to do. What do you think?

Sharing at Let's Bee Social and NTT!

Ps. We now have a Honey, Bunny, and Doll FACEBOOK GROUP! Join in to see an early preview of our upcoming quilt along!

Monday, January 22, 2018

On Ringo Lake {Clues #7, #8, & #9}

Having a three day weekend last week and then my husband being out of town for a few days this week was a big jump start on a number of projects, especially my On Ringo Lake quilt!

After finishing up all of the individual units, starting to put the units together seemed much faster, or rather, much more rewarding!

Clue #7 was pairing up all of our flying geese units -- working on this a little in the evenings made it go quite quickly!


I laid out the stacks of units with one another to get an idea of how my blocks were going to look. So bright, so lovely! 


These zipped together into blocks with very few uses of the seam ripper. A triumph! Here are all of my blocks.


Clue #9 is the reveal post with the quilt top construction. Last weekend I paired up all of the sashing units and sewing the top together was weekend's main project. I was able to lay everything out and get the blocks and sashings sewn into rows. I finished sewing the last few rows on the top Saturday morning. It's bright and beautiful!


I don't have anything on hand for backing and other things that will need to be quilted first, so I will start window shopping for a backing. I'm in a rather lovely and strange place right now where I have no pressing deadlines so I have been able to work ahead on some future projects as well as working on some of my just for fun quilts, like On Ringo Lake.

Although this probably needs it's own name to reflect its more tropical feeling! Maybe this should be On Montego Bay?

Sharing at Oh Scrap and Linky Tuesday! Also sharing retroactively at the *final* ORL link up!

Ps. We now have a Honey, Bunny, and Doll FACEBOOK GROUP! Join in to see an early preview of our upcoming quilt along!

Friday, January 19, 2018

Frosty Cabins Table Runner {Modern By The Yard}

I am excited to share that I have another project featured in Benartex's Modern By The Yard magazine! This time around, I put together a quick and easy table runner tutorial -- introducing Frosty Cabins!


This table runner takes log cabin blocks and slices them up for a fun and quick winter table runner! I used Amanda Murphy's Winter Games line -- a fun wintry (but not too Christmasy!) line that's perfect with the upcoming Olympic Games!


I used two different background fabrics and three different accent fabrics -- one red, one teal, and one green. My backing and binding is the large scale ski print. I quilted this with simple loops and just for fun I used red thread to do the machine binding!

Best of all, this pattern is free! Click here to access the full issue of Modern By The Yard! This issue also features projects by Sarah Goer Quilts, made by ChrissieD, and MMM Quilts!


Now that I've finally put all of my Christmas decorations away, I'm excited to use this as a wintry-themed table runner and root on Team USA!

Sharing at Finish it Up Friday!

Ps. We now have a Honey, Bunny, and Doll FACEBOOK GROUP! Join in to see an early preview of our upcoming quilt along!

Wednesday, January 17, 2018

Traveling Quilt Bee {My Finished Quilt Top}

After a long while, I think that I can count the top of my Traveling Quilt Bee quilt as done!

This bee was an Instagram-based bee that ran from June 2016-January 2017. We had seven ladies in our group and rotated quilts each month. This was my starter block:


And this is what my quilt looked like when it came back to me:


I passed along the quilt to my sister who worked with my mom over Christmas to finish the quilt top for me. Here's the finally finished quilt top:


Instead of adding more block sections to the quilt, they added two black borders surrounding a pieced middle border. It's a fun frame that adds a good balance to the quite busy center of the quilt.

Now the quilt is approximately 68" x 90", so I think it's ready to be quilted and finished. I've had the backing fabric for this set aside since before this bee started and it was the inspiration for my color scheme. I bought about 8 yards of this fabric on clearance at my LQS a few years ago so that it would be big enough to back whatever quilt I ended up making.


I pieced the backing and I still have two yards of the fabric left, so I can use it to make matching pillows. The print is a little too big in my opinion to try to bind the quilt, so I'll be looking for something to bind the quilt once I am able to quilt it.

My initial idea is to quilt each person's different section with a different filler. This would be less involved than my Stash Bee Star quilt which had different motifs in every star, since it would need only eight different motifs -- one for me, one for each of the six ladies in the group, and one for my mom/sister. What do you think of this idea? Is it kind of crazy, or is it a good homage to each of the people that worked on the quilt? I am really interested in making quilts with more meaning and I think this could be a fun way to accomplish that.

Sharing at Let's Bee Social and Needle and Thread Thursday!

Monday, January 15, 2018

Coast to Coast Bee Round 2 {Starting My Quilt}

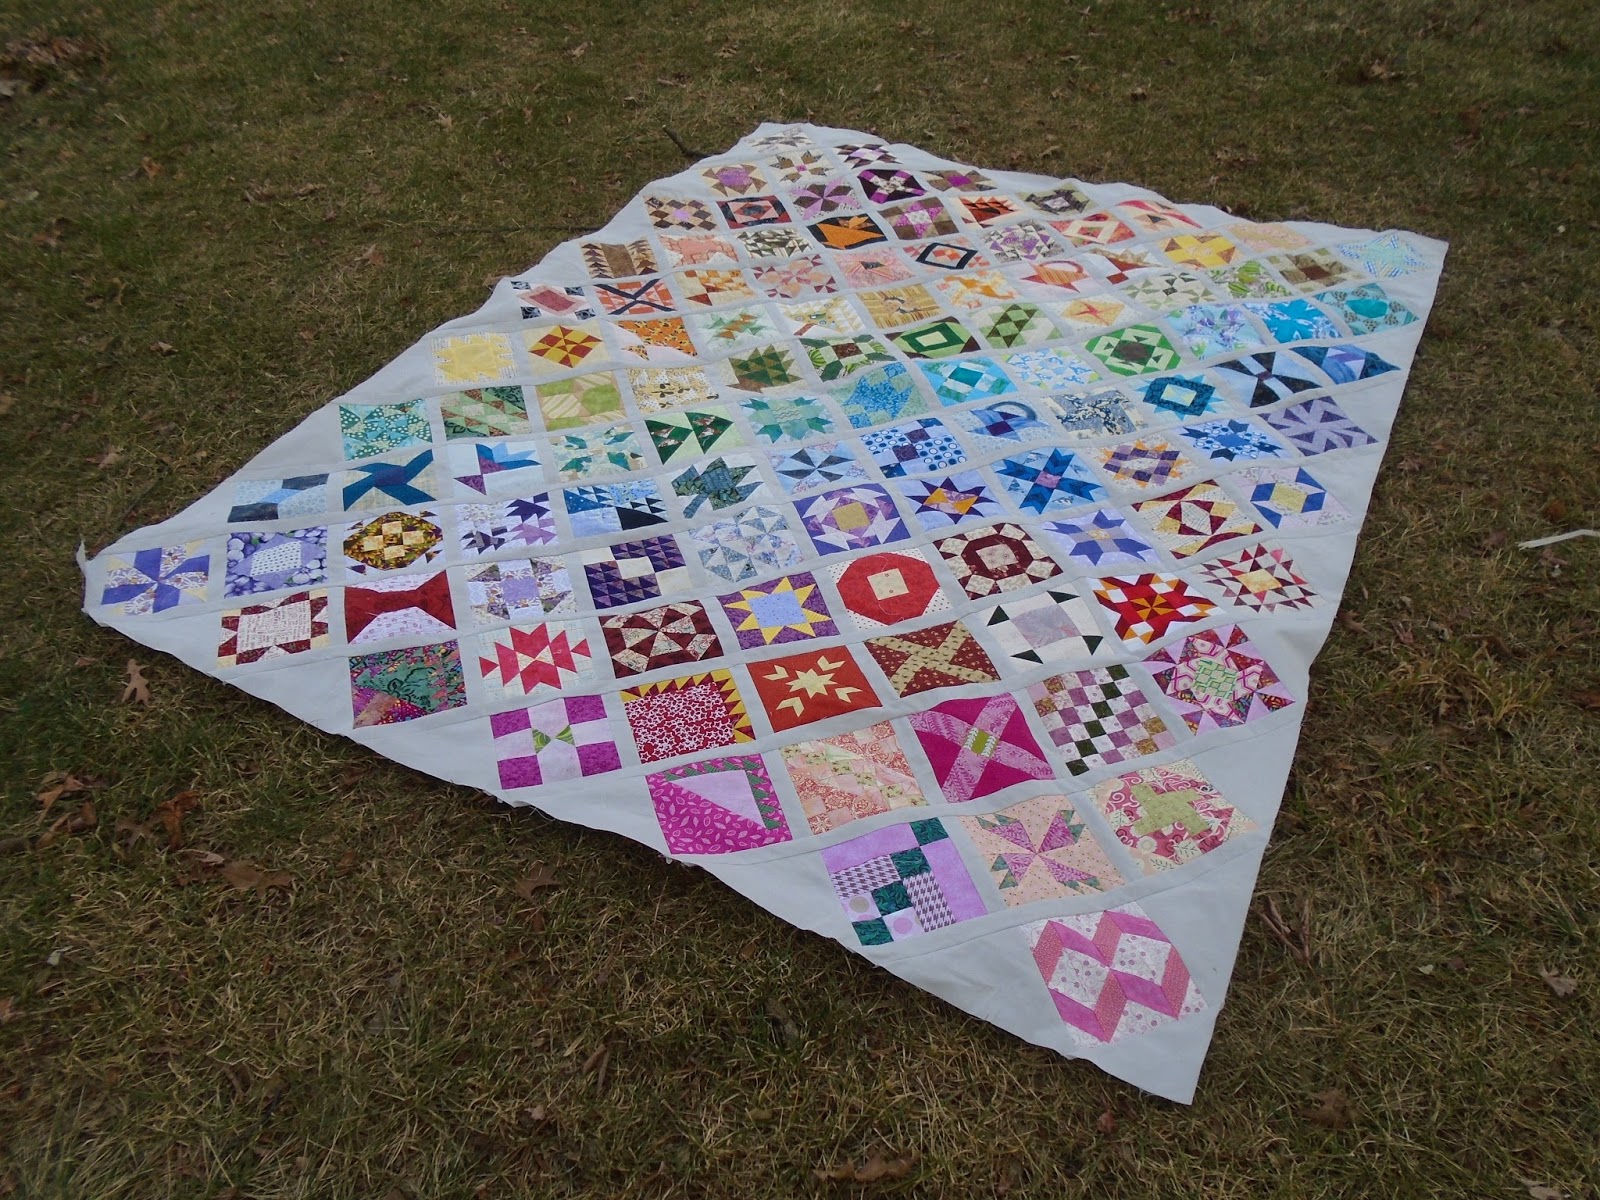
Because we had SO much fun last year, most of our Coast to Coast (C2C) Bee have returned for another year! Just a reminder of my quilt top from 2017, which I still need to finish!


My quilty friends this year are:
Audrey (Hot Pink Quilts)
Chelsea (Patch the Giraffe)
Stephanie (Quilt 'N Party)
Karen (who is mysterious!)

Last year I loved starting with a fabric line and letting my cohorts add in other fabrics as they choose. I picked through my sets of coordinating fabric and found a set of two charm packs and some yardage of an older line from Benartex, Breezy Blooms. I believe my mom bought this for me when she was on a shop hop. Here's a sampling of the fabrics:


I also have a few bright solid fat quarters in pink, orange, yellow, and green, and a VERY large chunk of the black floral in the top row of the picture. I saved part of it for myself to potentially use as borders for the quilt.

This year instead of a medallion, I am requesting a row of blocks 48" long from my friends for a row quilt. They can make their rows any height -- 48" long works well with a variety of block sizes! I drew a picture of my "vision" quilt in my notebook that travels with the quilt.


I requested either white or bright solids (I sent some with my fabrics) be used as the background in each row. My plan is to sash the rows together with black solid and then to use the rest of my large floral print as a border. It's VERY modern traditional, and perfectly me!

For my starter row, I chose to make a row of four 12" finished blocks. I used the Folded Corners block pattern. I used a pink solid background for my blocks and made each block in a different color.


My quilt has been mailed off to Stephanie, and I have Audrey's quilt starter to work on this month! Here's what it looks like thus far:


Her theme is "flight" so my initial thoughts are pinwheels and flying geese!

Have a wonderful Monday! I'm going to stay in my Scottie Dog pajamas for as long as I possibly can today.

Sharing at Linky Tuesday!

Friday, January 12, 2018

Garden Plots {New Moda Bake Shop Pattern}

I'm so excited to share about my newest Moda Bake Shop Pattern -- Garden Plots!

(Update 7/1/2020: This pattern is no longer available on the Moda Bake Shop website. It is now only available in the book, Best of Moda Bake Shop.)


This is a complicated looking quilt that has all straight seams! This could easily be accomplished by a confident beginner or intermediate quilter! Each block uses two jelly roll strips -- I chose to make each block using two different fabrics.


I quilted this quilt with an all-over meander with flowers -- my go to motif as of late!


This quilt uses one jelly roll and a total of a yard of fabric for the focal fabric portions of the blocks. I used three different fabrics for the large centers of the blocks.


I also wrote this pattern so that you could use either 3 yards of fabric -or- a neutral jelly roll as your background fabric. I used yardage but the directions don't change if you wanted to use a jelly roll and save time!


I had some trouble fighting the shadows given that I took these pictures before sunset, but some of the pictures show such amazing texture!


The fabric line used in this quilt is Voyage by Kate Spain! I absolutely love the purples used in this line. Every other block is turned 90 degrees which accomplishes two things -- it eliminates the need for sashing between the blocks and it also means that you only have to match the seams between the blocks themselves and not any of the "gears" around the block!


I used the large scale floral flourish print in three colors -- pink, teal, and blue -- as my block centers. I also used the teal fabric for my backing and the pink print as my binding. There is also a final "border" of background strips around the 16 blocks to help the blocks float on the background.


Don't forget to share your finished quilts using my patterns with me -- I love seeing them!

Sharing at Finish It Up Friday!

Tuesday, January 9, 2018

Twinkle Quilt featuring Mountain's Majesty {Four Seasons Blog Hop with Island Batik}

Yesterday was the kick-off of Island Batik's Four Seasons Blog Hop and today is my day to share a wintry themed quilt with you featuring the new line, Mountain's Majesty!


Mountain's Majesty is actually composed of multiple colorways, my project uses the fabrics and colors on the top half of the image below.


I received both navy and light blue large cuts with my fat quarter bundle, and decided to use the navy as my background because it reminds me of the dark starry skies in the wintertime! So off I went to create some star blocks to bespeckle my navy sky!

I actually designed this Nested Friendship Star block (modified slightly for this version) back in 2014 and have since then wanted to put together a full quilt with this block. This fabric bundle was perfect to do just that!

Say hello to "Twinkle"! This pattern is now available on Etsy and PayHip!!


I used 20 different fabrics in the quilt top (16 different fabrics for the large stars, 3 fabrics for the small stars, and the background fabric) in addition to the light blue print for the binding. Because I'm selfish and love this quilt and plan to keep it for myself, I backed it in teal flannel so it is EXTRA snuggly. I'm already working on a pattern for this quilt so keep your eyes peeled.


For the quilting, I did a large, all over meander to keep it soft and cuddly. The binding is a light blue print with trees and I machine bound it. I was really hoping that I would be able to take pictures of this quilt in the snow, but instead it was just bitterly cold.


Itching to win some of this fabric for yourself? I cut all of my extra fabric into charm squares and ended up with enough to send 60+ 5" squares to not one, but TWO lucky readers!

Leave comments to win, lots of options, choose one or choose all! I will leave the comments open until Monday, January 15th at midnight.

1. Leave a comment with your favorite new fabric line from the Fall 2017 IB Collection (shipping now!) or the Winter 2017/2018 IB Collection (shipping in April!).
2. If you follow Island Batik on social media (blog, Instagram, Facebook, etc.) leave a comment and tell me how you follow.
3. If you follow Little Bunny Quilts or Honey, Bunny, and Doll Quilts (Bloglovin', Instagram/Instagram, Facebook) leave a comment and tell me how you follow.

Update: the giveaway is now close and Pat and Claudia are the winners!


Please see this post for the entire blog hop schedule -- just about every hop stop will have a giveaway of some sort, so it doesn't hurt to check them all out! There is also another giveaway on the Island Batik blog -- use the Rafflecopter to enter!

Thanks for stopping by to check out Twinkle! This pattern is now available on Etsy and PayHip!!

Sharing at Linky Tuesday, Let's Bee Social, Needle and Thread Thursday!

Monday, January 8, 2018

On Ringo Lake {Clues #5 and #6}

While the big reveal has taken place, I'm still trudging along with the clues for On Ringo Lake!

With our holiday travels, we were already in Ohio when Clue #5 was released on the 22nd and I didn't take any of my fabrics or tools with me. I did however dig through my mom's scrap bins once we were in Michigan and find some fabrics to add to my On Ringo Lake fabrics.


I did all of the orange and black cutting for Clue #5 on Christmas Day, and did the cutting for Clue #6 on December 29th, but wasn't able to start any of the sewing until this weekend.


I did Clue #6 first, adding the triangles to Clue #4. I still need to trim the dog ears but I am loving how bright these units turned out!


It seemed like Clue #5 went faster than the previous batch of geese that I had made in Clue #2. I trimmed all of these units while we watched football and the Golden Globes last night. Either way, I am now complete through Clue #6!


My goal for this week is to get the goose pairs sewn together for Clue #7 in the evenings so that I can put together my blocks for Clue #8 this coming weekend! I will need to go back and make a few extra units for the sashing and setting, but I believe that I have enough of the necessary units to make the blocks themselves. My version will be 25 blocks on point and end up somewhere around 60 inches square, I estimate.

Check out everyone's ORL updates on the Quiltville blog! Also sharing at Oh Scrap!