Showing posts with label binding. Show all posts

Friday, August 9, 2019

Magnolia Mystery Quilt {Finished Quilt}

I set a hard-stop limit on myself that I wasn't going to allow myself to start the new mystery quilt (Mosaic Mystery Quilt) until I finished my Magnolia quilt and now I have one fewer WIP on my list!


Here's the quilt post-trimming, pre-binding:


For the binding, I used a red cable print and cut it to create the stripey binding.


The grey thread was the exact right shade for the background fabric (Kona Coal) but isn't too obtrusive on the print fabrics. I bound this quilt entirely by machine and used white thread to do the final top stitching but had grey in the bobbin since it blended well on the backing fabric as well.


My quilt is slightly modified from the original pattern -- I added the sashings and cornerstones between the blocks and my quilt has the blocks running vertically rather than horizontally (however the picture above is hung the other way just because it shows the blocks better). I think the final size is similar to the original pattern.

I have made quite a few red, blue, teal, and green quilts lately!
April Showers
Good Fortune

Quilt stats:
Name: Magnolia mystery quilt
Pattern: Magnolia Mystery Quilt by Cheryl Brickey of Meadow Mist Designs, modified
Fabrics: Kona Coal and scraps for piecing
Quilting: free motion quilted meanders and semi-custom quilted blocks
Size: 70" x 60"
Started: August 2017
Finished: August 2019
Future: TBD

Sharing at Brag About Your Beauties and Oh Scrap!

Also sharing at Favorite Finishes for August!

Monday, July 22, 2019

Too Hot To Trot {Literally}

Depending on where in the world you live, you might have spent your weekend similar to me: being outside as little as possible and avoiding the awful, oppressive heat and counting down the hours until the cool front moved in.

Saturday I had to make a quick trip down to the quilt shop to drop off quilts for their gallery! We are just so excited that Capital Quilts is carrying some of our favorite HBD patterns and that I am teaching a class there in just two weeks! If you are semi-local, consider coming out for a class on our Ready, Set, Soar Pattern!

While I was there, I picked up a couple cuts of fabric. The top fabric, from Vintage Picnic, will be the binding for my April Showers bee quilt. The other two fabrics were picked from clearance for general stash additions.


I spent the rest of the day working on the bindings of the three quilts that my mom brought back to me from the quilter -- two went to the long armer and one quilt she quilted. One by one, I trimmed each quilt and added the bindings to my Double Delight. Good Fortune, and April Showers quilts.


This was the pile of aftermath on my kitchen table from trimming three quilts. While I bought the navy pear fabric for the April Showers quilts, I used the backing for the binding for both Double Delight (the navy fabric peaking out) and Good Fortune (the red fabric). I hand bound Good Fortune, but the other two quilts were bound completely by machine.


(A quick aside: would you find it helpful for me to write a tutorial about using the backing for binding? Talking about trimming your quilt after quilting to maximize usable fabric? Tell me in the comments!)

So spoiler alert: I have three (t-h-r-e-e!) finished quilts that I will be showing off over the next two weeks! But none today, because the heat was just too much to try to take pictures of them outside.

I had also not yet put away my Jingle Bell Square fabrics, so I decided that I would make whatever units I could make -- not necessarily worrying about making full blocks -- and set them aside for the next time I pull out this project. In sorting my scraps, I found some larger pieces that allowed me to squeeze out *five* more blocks for this project!


Now I have 14 red blocks and 12 green blocks -- a total of 26 out of the 49 that I need to make -- now I have officially crossed the 50% mark!

I have also been keeping up with making my border QSTs and did end up with a few extra block parts:


But, ideally, the rest of this week's blog posts will be dedicated to finishes! It will be so nice to have fewer WIPs on my list -- and we'll see how long I can resist starting a new project!

Sharing at What I Made Monday and Wednesday Wait Loss!

Friday, February 22, 2019

Stars at Play {Finished Mini Quilt}

My latest mini quilt is complete! Making mini quilts was our "assignment" as Island Batik Ambassadors this month -- a fun and quick project was just the thing for me this month!


These fabrics all came in my latest Island Batik Ambassador goody box and I based my fabric pull around the mottled "peacock" accent fabric. As an Island Batik Ambassador, I am provided with samples of various lines of Island Batik fabrics to use and share with you! 


I decided to use our "in the pipeline" pattern Stars At Play in the mini quilt size for this project. I used this pattern last year to make a baby quilt! This mini is just a scaled down version of that quilt -- using 6" blocks instead of 9" blocks.


For the backing, I used a large cut of black solid batik (yes, this is a thing!) and layered it and the top with some pieced-together batting scraps. I decided on using the teal Auriful thread for the quilting but decided to use grey in the bobbin. Since the threads were just different colors of the same weight thread, I didn't run into any tension issues, which made the quilting process quick and easy!

I used a swirl-and-loop motif that I have used a few times before -- just in a smaller scale for the mini quilt.


For the binding, I used a grassy green batik. Instead of simple topstitching, I decided to go fancy and use a decorative stitch for sewing the binding to the front of the quilt. I used a leaf-shaped satin stitch (#25 on my Magnolia) in a chartreuse green Aurifil thread.


Now this quilt is ready to hang in my sewing room! 


Quilt Stats:
Name: Stars at Play Mini
Pattern: Stars at Play
Size: 24" square
Fabrics: Various Island Batik fabrics -- a half yard of the main peacock print; 5" strips of other fabrics
Quilting: curls and loops
Started: February 2019
Finished: February 2019

Sharing at Brag about your Beauties and Linky Tuesday!

Wednesday, November 28, 2018

Quarter Cabins {Finished Quilt}

With just a little time to spare, my November Island Batik Ambassador project is finished!

This quilt top ended up being a little over 50" square, so it was the perfect size to try out the Hobbs Wool batting that came in my summer IB Ambassador goody box!

Here's the jewel-toned beauty -- I had to fight some nasty wind to get these pictures today!


As an Island Batik Ambassador, I am provided with samples of various lines of Island Batik fabrics to use and share with you, as well as thread and batting samples!


This was my first time quilting with a batting that is 100% wool. The fluffiness intimidated me a little bit! I decided that it would be best to do a medium scale meander for this quilt -- a motif with which I have a lot of confidence! I used a grey Aurifil thread to do the quilting and purchased some grey flannel for the backing.


One thing I will say about this batting -- I'm not sure if I can attribute it entirely to the content, batting size, or the way that the batting is folded (not rolled!) -- the folds in the batting smoothed out much quicker than the typical cotton or cotton-poly blend. It gives this quilt a beautiful "puff" too!


I bound this quilt completely by machine using the purple checkerboard fabric. I used a purple Aurifil thread to do the final topstitching.


Now the quilt is finished and (probably) ready to be gifted! I have a number of people that will be receiving quilts for Christmas, but I need to decide who gets which quilt!


Quilt Stats:
Name: Quarter Cabins
Size: 51" square
Fabrics: Spirit Rhythm collection from IB plus checkerboard fabrics for setting triangles and binding
Quilting: simple meander in grey Aurifil
Future: Gift quilt!

Started: October 2018
Finished: November 2018

Sharing at Let's Bee Social and Needle and Thread Thursdsay! And Finish it up Friday, too!

Friday, November 17, 2017

Meadow {Finished Quilt}

Finishes make me SO happy!

The last little bit of quilting on my Meadow Quilt involved more meanders and loops in each corner.


I pulled four different binding fabrics -- I didn't have enough of any of my original fabrics left to use for binding, and I decided against using the blue floral backing. I narrowed it to two -- magenta and emerald -- and finally settled on magenta!


I decided to hand bind this one -- mainly because it was good timing to sit and stitch on a binding while watching TV! I am so pleased with how this quilt came together!


This is the perfect throw size - 60 inches square. I love all of the quilting textures in this quilt and am so happy with the way the different prints coordinate and contrast with one another.


While there isn't actually much white in the quilt top, I think the white background of the binding print is a good contrasting element without being too different. The magenta color is the same as the magenta print fabric and the magenta in some of the pansies.


The binding looks especially good with the backing! I honestly just picked this backing because I loved the print (and I love a large scale print for a backing any day of the week!) and it was on super duper sale. I also am happy with the large chunks of this print that I have left over. :)


The navy print also shows off the white thread that I used so well! The white thread blends with the fabrics on the front for lovely texture, but I like being able to see the white wiggles, loops, and curls on the navy backing.


It was SUCH a nice break from projects with deadlines and projects for others and to do something just for me! Now back to reality!


Quilt Stats:
Pattern: Meadow Mystery Quilt by Cheryl of Meadow Mist Designs
Size: 60 inches square
Quilting: Custom FMQ with curls, loops, and wiggles in white thread
Binding: double fold, hand stitched to backing
Fun facts: Everything but the backing came from my stash!
Started: July 2016
Finished: November 2017

Sharing at Finish it up Friday!

Tuesday, November 8, 2016

Playing with Firecrackers {Weekend Update}

Since my husband was out of town from last Wednesday until today, that meant I had oodles of unadulterated sewing time (and binging Gilmore Girls.) I have lots of finished, almost-finished, and new things to show over the next few days, hooray!

But, as a teaser, today is sneak peak day!

First up, is my primary Little Firecracker quilt. When last I posted about this quilt, I had just finished all of the blocks.


I also shared this finished preview shot of the quilt top on Instagram a while back:


And by "a while back" I mean April. I need to up my organization -- good thing Santa might be bringing me a Quilter's Planner!

Since I want to try to get *BOTH* of my Little Firecracker quilts done by Thanksgiving (if not earlier!) getting both of them quilted was my big project for my solo retreat weekend. AND I SUCCEEDED! I'll be sharing all about my secondary Little Firecracker's progress in a separate post since I hardly took any pictures of that one in progress - it needs a little attention of its own!

On the primary Little Firecracker quilt, I did a branching curl design.


For the backing, I used a three yard cut of a large stripe border print in navy and green (a little traditional but matches the quilt perfectly) pieced with a pink and red leaf print on white. I strongly considered buying flannel for these quilts, but with the odd size (55 inches square) I would end up with a lot of backing waste so I opted to use older large cuts in my stash for both quilts. Pictures coming in the finished post!

For the binding, I used a dot print with a dark red background with multi colored dots that coordinate with my quilt colors. I started hand stitching the binding to the back during the Walking Dead on Sunday night but didn't make a ton of progress. 


In other news, I am starting idea-gathering for a quilt along next year. If you have opinions and suggestions on what you would like to see or do in a quilt along here at Little Bunny Quilts, please share those in the comments! I love to hear what people are thinking!


Thursday, May 26, 2016

Finished Good Karma Placemats

Hooray for finishes -- no matter how small!

My Good Karma placemats are now finished. It took me slightly longer than one evening to do the binding, but I am thrilled with the results.


As I mentioned in my previous post, these were scraps leftover from my Frame of Mind quilt, with the exception of the binding, which came from my Square Pegs quilt.

For the binding, I machine bound each and for the stitching on the front, I used a decorative star stitch. It uses a lot of thread, but it is just so cute! I've used it before on the shelf runners I made for my baker's rack.


Gratuitous corner shots because they turned out GREAT on all four placemants -- a true miracle!


These shots also show the quilting off well if you didn't have a chance to look at it before. This is now the fifth time I've used this motif for a major FMQ project. It's a good one to have in the arsenal because it is easy to scale up and down and can be adapted as an all over filler or for your borders.


These are now adorning my table and bringing in some spring! I did also ScotchGuard these placemats (which I haven't done before) because of all of the white fabric. We'll see how well that holds up against all of the sticky and stain-producing things that we eat on the regular. :)

Sharing at Free Motion Mavericks and Finish it up Friday!

Thursday, April 30, 2015

Finished April Umbrella Wall Hanging

Houston, we have a finish!

Over the last few evenings I've been able to do all of the background quilting on this wall hanging and finish it up -- ta da!


I did the rest of the quilting with meandering loops and quilted all of the background. I didn't do any quilting on the flowers, leaves, stems, or the umbrella handle to help them stand out.


As I mentioned in my progress post about quilting this one, it's slightly difficult to see the quilting on the backing fabric, but I think it shows up decently well in this picture. No puckers -- yeah!


I used some of my 2.5 inch strip stash to do the binding with a dark bright teal. No fancy stitching on this one because I didn't have a good thread color at the ready so I just used off white to straight stitch the binding. The corners turned out REALLY good (like, unusually good) and I'm not going to complain!


Don't forget that Monday is the next post for the Row Quilt QAL and that you can still link up your finished 8 inch block rows!

Linking up with Finish it up Friday and Free Motion Mavericks!

PS. I'm signing up for Sara's Halloween Mini Swap! Check out the info here!

Friday, March 13, 2015

Finished March Wallhangings

Yay for more finishes!

This last week has been kind of busy with work (both jobs!), but I still managed to finish my "regular size" March wall hanging for at home and my "mini" wall hanging for at work.

I posted on Instagram when I got  all of the satin stitching done on last Thursday (snow day!) and then did the quilting and binding on Sunday. This was the first time that I used a single color for all of my satin stitching for one of these wall hangings and I am very happy with how it turned out. It definitely helps the birds, tree, and flowers jump out from the busy background. I did vary the width of the satin stitching in a few places because of how small some of the pieces were.


Here's a close up of the birdhouse and I think this picture shows both the different widths of the satin stitching that I did and shows off the quilting. For the quilting I did an all-over pattern that started with a swirl and then I did two layers of flower petals around each swirl. I think it turned out very well and it wasn't too dense or too open.


I think the little red birds might need some button eyes.

Here's a close up of another one of the flowers and more of the quilting showing up well. I used a purple and yellow on creamy-white floral print for the binding to try to bring out some of the non-green/teal colors in the wall hanging. I used this old spool of purple variegated thread (unfortunately you can't really tell it is variegated in these pictures!) to do the top stitching on the front of the wall hanging using this herringbone-type decorative stitch.


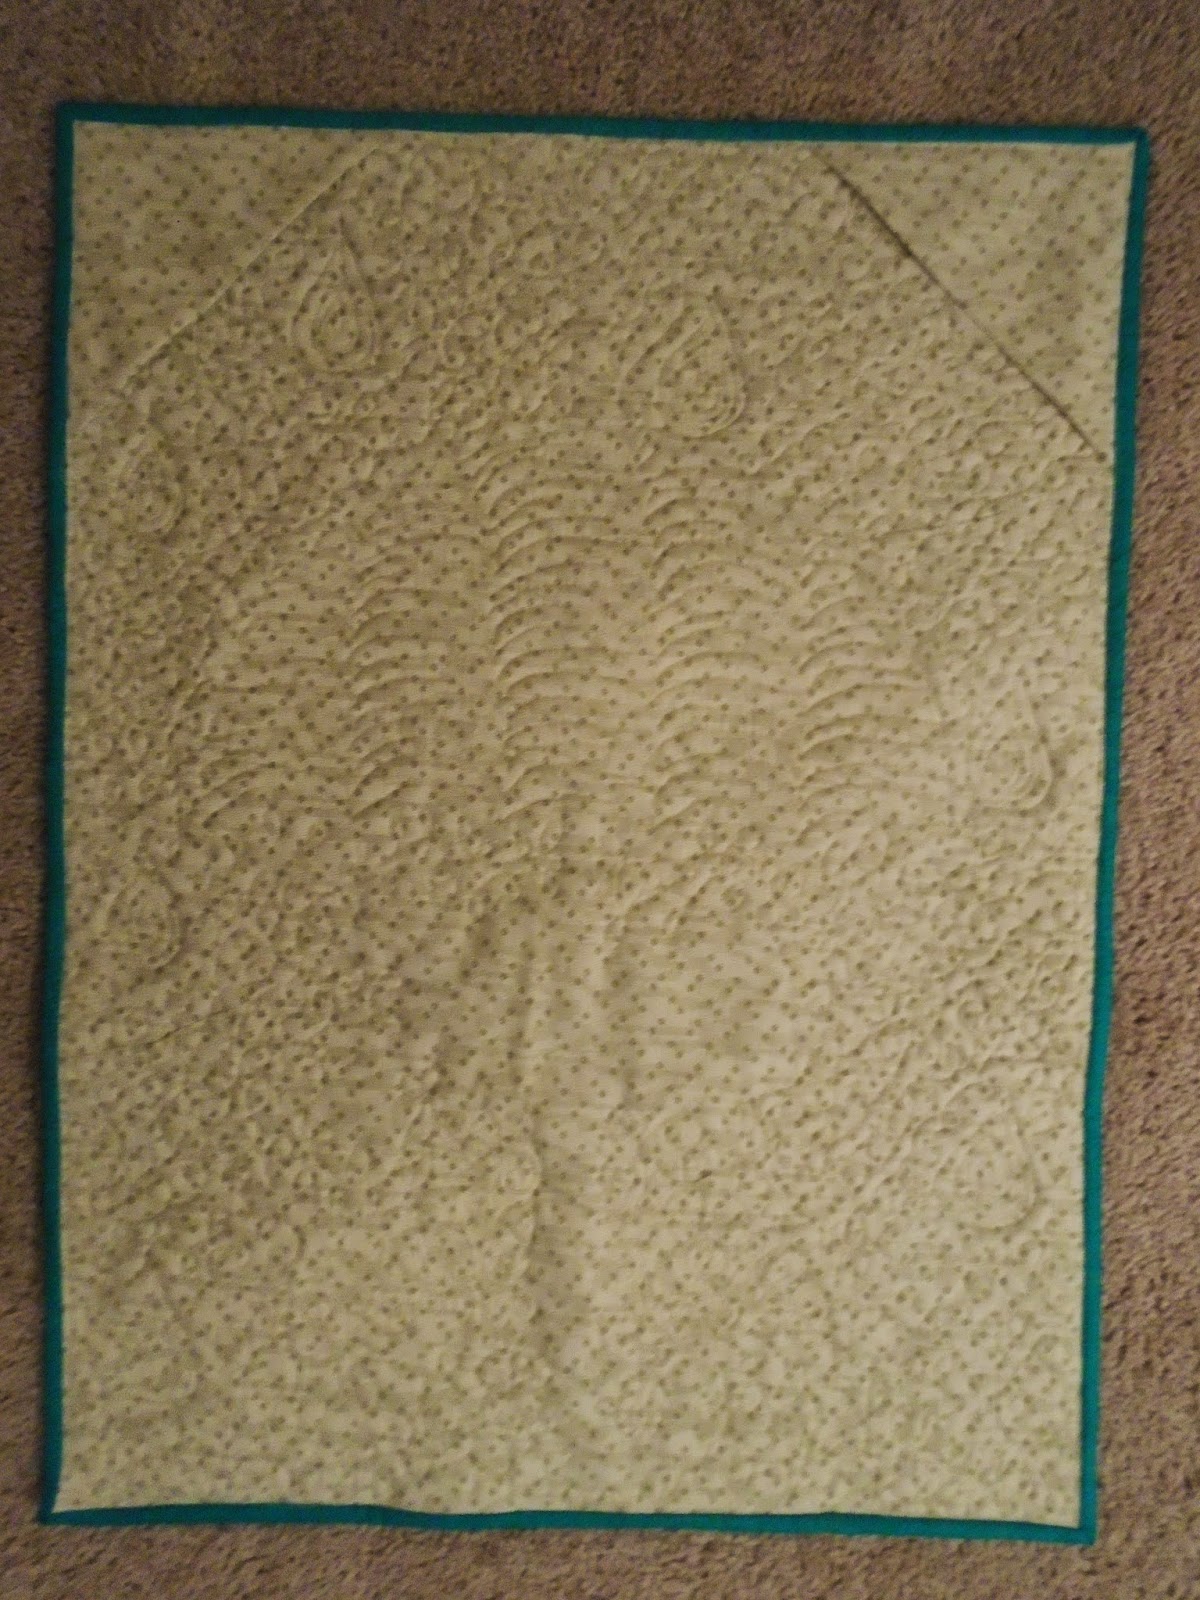
On the back I used the same green fabric for the back and the pockets. The fabric is one that I've had in my stash for a long while that I bought when Park Ranger Husband and I were visiting Ohio and I bought the end of this bolt. It's a very cute fabric but for a quilt shop fabric it's kind of on the flimsy side, hence why it's on the back of a wall hanging.


Here's a shot of the quilting on the back and a closer up view of the backing fabric.


And now onto my March mini! Forgive the semi-atrocious fluorescent lighting, I have no windows.

I used all teal pieces for the backing on this one with lights in the middle and darker pieces around the outside (like basically all of these!) and I just put a bird and a birdhouse on it. I thought about doing a flower too, but I was worried it would look too busy.


For the quilting, I used the "gridlines" created by the squares to use as a guide to do a simple clamshell quilting motif. If you look closely, you can see that the "dips" of one row line up with the seams, and the "dips" of the next row line up with the center of the block -- at least for the most part. it was a little harder to stay consistent in the middle where the birdhouse was, but I did my best to keep things evenly spaced and of the same approximate height. All in all -- a good new motif added to my arsenal. Not something I would do on something very large, but a fun accent motif, I think.

Here's the back -- yes, I do hang it up with a pencil.


This squiggly fabric is left over from my Beau's Ties quilt and I have a LOT Of it left over, so I'm probably going to be using it for a lot of wall hanging backings in the near future. I also bound this one with the same fabric -- the squiggle looks so good as a binding!

I'm linking up at the usual places -- free motion mavericks and finish it up friday!