Wednesday, August 30, 2017

Bloomed {Two Blue in Bloom Tops}

Hip hip hooray! I was able to finish the two final pieced borders of my second Blue in Bloom quilt! If you missed the first finished top you can see it here!

This quilt has a yellow outer border.


Having all of the HSTs and flying geese units ready to press and trim made putting the last two borders on so fast! I pressed and trimmed all of the units on Sunday afternoon during the baseball game (and my husband napping) and finished the borders on Sunday night.


Now both quilt tops are finished and are ready to be quilted at my leisure! The idea that I have almost three months to make that happen is such a welcome change from my normal M.O. of getting things quilted the weekend before!

Don't forget that you can get your own copy of this pattern from our Etsy shop! I've posted the yardage requirements below for those interested!


Have a happy Wednesday! Sharing at Let's Bee SocialNTT, and Finished or not Friday!

Monday, August 28, 2017

Top Spin {24 Blocks}

The other project that I worked on prior to going on quilt retreat was my Top Spin blocks. I had amassed quite a large stack of HSTs that needed to be pressed and trimmed for blocks so both last weekend and this weekend I worked on putting together more blocks.

In total, I am up to 24 blocks -- halfway to my goal! Here are all 24 blocks laid out together:


The more blocks that I make, the more happy I am with the grey background. Based on what I have cut and the HSTs that are already sewn, I should be set on small HSTs and may need to cut a few more of the squares for the medium and large HSTs. Having had some new scraps "rotate in" since I did the original cutting for this project, I'll hopefully be able to cut some different fabrics to add into this project.


For now I'll be putting the block parts away, but I'll keep working on making more large HST units as my leader and ender sewing. It is a wonderful feeling to be nearly halfway done with the blocks for this scrappy project -- where 100% of the fabric (including hopefully the backing!) will come from my stash!

Sharing at Main Crush Monday, Monday Making, and Linky Tuesday!

Friday, August 25, 2017

Quilt Camp {Retreat Round Up}

In the days leading up to leaving for quilt retreat last Saturday, my husband started telling me that I was going off to "quilt camp". After I told him that the place had on-site massages and pedicures, he asked if I planned to come home!

My mom and her quilt friends have been going to a few different retreat locations throughout Michigan for the last ten years or so. She has been wanting me to take the time off to go with her, and this year was the first time I have been able to make that happen.


We stayed at (and essentially never left!) Creative Passions in Chesaning, Michigan. CP opened in 2005 with one building that accommodated 16 people, and soon will be able to accommodate 101 people in 4 buildings! The owner and her team have done an amazing job remodeling two churches as well as a former mill into amenity filled retreat spaces -- which I was too busy sewing to take pictures of! We stayed in CP2 -- one of the church buildings -- and took advantage of the local restaurant that brings catering right into the kitchen for you.

I would totally, absolutely, positively go back to retreat here. The price is fabulous and there is almost no reason to leave the retreat center between being able to cook in the kitchen and order food in! I just wish it wasn't so far for me to go!

Now onto the sewing! I took my two cut Blue in Bloom projects as my main retreat projects and was able to finish one top completely and complete about two-thirds of the second!

I worked on my green version first -- and little did I realize how much longer it would take than I had originally thought! With the main green print being directional and me being much too much of a perfectionist, I spent a lot of time making sure that all of the green print pieces went in the same direction throughout the entire quilt!


The second one went together much quicker than the first but I still wasn't able to complete the quilt top before I left for the airport on Wednesday. I was able to finish the first pieced border and all of the units for the second and third pieced borders are sewn but not pressed nor trimmed yet.


I am hoping to have the second quilt done soon so that I can quilt both quilts at my leisure between now and the beginning of December! I will need to get a backing for my blue version, but that will be no problem at all!

Have a happy Friday and wonderful weekend! Sharing at Finished or not Friday!

Thursday, August 24, 2017

Ivory Drive {RSC August 2017}

I'm back from retreat! It was a wonderful and relaxing time and I can't wait to share more about it tomorrow! But for today, I wanted to share my August Rainbow Scrap Challenge blocks that I actually finished on Saturday before leaving for the airport!

Our August color was lights - whites, off-whites, creams, greys, etc. - so I picked three fabrics to make my houses. The left is an old Denyse Schmidt print, the middle is from the backing of my Clover Sunshine quilt, and the right fabric is from Allison Harris's Wallflowers line.


These went together well and I pulled green and blue fabrics (my biggest scrap piles!) for the windows and doors for each.


I made sure that the diagonal strips in the last house are all going in the same direction, which is what I usually try to do with directional fabrics for these houses. I did the same with the green windows in the grey house too!

These three bring up my house total to 35! Just a few more and I'll be ready to start putting the top together. My goal is 42 or 48 for a twin sized quilt.

Happy Thursday! Sharing at Scrap Happy Saturday and Oh Scrap!

Sunday, August 20, 2017

6 Years {Blogiversary}

Then: 23 year old grad student in a long distance relationship with her Park Ranger Boyfriend using quilting as her stress reliever. Living alone, watching way too much Netflix.

Me at Gettysburg in 2011, not long before starting LBQ
Now: 29 year old cancer researcher with a Park Ranger Husband and two rabbits; 1/3rd owner of Honey, Bunny, and Doll Quilt Designs, working with three different fabric manufacturers. Recently developed a baseball obsession.

Park Ranger Husband and I at a wedding this summer
Six years is both a long time and a short time. A long time in that a lot can happen: I got married, got a Master's degree, moved to Maryland, got hired at my first "real job", left that job for my dream job, adopted two rabbits, and started a small business with the help of my mom and sister. A short time in that in the grand scheme of things it goes by in the blink of an eye.

I didn't start this blog with an aim to build a quilting empire, just as a creative outlet from my rather stressful stint in grad school. According to the tags on my posts, I have completed over 100 quilting projects of various sizes in that time! Here is one favorite finish post from each year:

2011: Geometric Rail Fence (self designed and apologies for horrific photography!)


2012: Seville quilt (pattern by Cluck Cluck Sew)


2013: Civil War Quilt (pattern by Barbara Brackman, gift to my then-fiance, now-husband)


2014: Dashing to the Chapel (designed with mom as a wedding gift to my sister - pattern here)


2015: Frame of Mind (my FIRST pattern for Moda Bake Shop!)


2016: Wallflowers row quilt (self designed - pattern from 3rd quilt along)


2017 (so far!): Rainbow Sampler (self designed - first magazine quilt and first magazine cover)


Thank you all for going on this journey with me! I'm very proud to be a part of such a wonderful online community of quilters and artists.

Friday, August 18, 2017

Blue in Bloom {Project Planning}

As mentioned in my August Brutal Honesty post, I am planning to make throw sized quilts for the college girls that I advise as end-of-the-year gifts. Last year, I made the two Little Firecracker quilts for their predecessors and made a sizable dent in my 2.5 inch strip stash.

This year, I decided to again make "twin quilts" -- the same pattern for both quilts but in different color schemes. I decided on our Honey, Bunny, and Doll pattern, Blue in Bloom, originally made and designed by my sister as a king sized quilt. 


I am making the throw sized version, which finishes at 55" by 75". The first thing I needed to do was stealthily figure out what colors to use in each quilt, so I emailed one of their cohorts, who got me the 411 -- one said shades of blue and one said green. So one quilt will be a "Blue" in Bloom, and one will be a "Green" in Bloom!

For both quilts, I wanted to pull the majorities of the fabrics from my stash. This was relatively easy to accomplish given the yardage requirements for the prints: 1 1/4 yard, 3/4 yard, 1/2 yard, 1/4 yard, and 1/4 yard. 

For the Blue version, I was able to pull all of the fabric from my stash. Here are my five fabrics:


The blue large floral will be the blue in the original quilt, the yellow geometric print will be the outer green border fabric, the aqua floral will be the yellow pinwheel fabric, and the green floral and multi-colored chevron print fabrics will be the green and teal fabrics from the center. 

For the green version, I struggled to find a green or mainly green fabric in my stash that would work. I found a green dot print that I loved online and ordered 5 yards of it so that I have enough of it to back the quilt with the same fabric. 


The green dot will be the blue in the original quilt, the light green and brown floral print will be the outer green border fabric, the brown print will be the yellow pinwheel fabric, and the purple/brown and aqua medallion fabrics will be the green and teal fabrics from the center. I also have a half yard of a green/brown version of the purple/brown fabric that I plan to use as the binding.

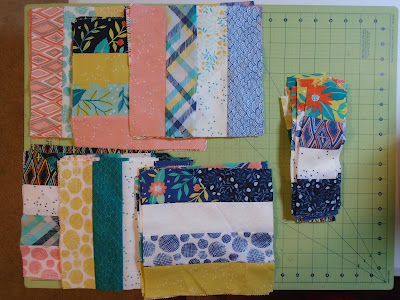
Since these two quilt tops will be my main focus while I am on quilt retreat next week, I did all of the cutting for both of these projects other than the backgrounds.


I still need to make final decisions on the background fabric for each and cut the background fabric, but I will do that once I can compare colors in person in a few days. I am thinking white for the blue version and some sort of off-white for the green version.

Wish me luck -- my goal is for these to become complete quilt tops while I am gone!


Wednesday, August 16, 2017

Quilt As You Go {Easy Peasy Picnic Quilt}

I decided to change my mind completely about what I was going to do to make my Island Batik Ambassador project for this month. That's my prerogative, right?


Instead of trying to overdo it with a technique I have never used before, I decided to go sweet and simple. I'm super happy with the fact that this took less than 4 hours start to finish!

To start off, I cut a piece of scrap batting to approximately 40 inches by 45 inches -- slightly larger than what I wanted my finished piece to be. I pieced what I'll call "the backing" from a half yard cut, two quarter yard cuts, and one 5 inch wide strip for a backing approximately 38 inches wide by 44 inches long.

Here are the batting and the "backing" layered together:


To piece the "top" I decided that I would alternate between 5 inch strips and 2.5 inch strips. I tried to use fabrics that were rich earth tones.


I started by laying my first 5 inch strip across the batting at a diagonal. I chose to do this at a diagonal rather than parallel or perpendicular to the lines of my backing so that I didn't have to worry about making sure things lined up on both sides.


The center was a little awkward to wrangle, but the more strips that I added the easier it got!


It was no time at all until I had reached the corners and the light at the end of the tunnel!


The corner pieces could be significantly shorter, so I was able to use some smaller scraps as well. Here's the "top" all finished:


Here's the back after finishing the top:


I actually used the "back" to trim the quilt top to make sure that I didn't trim too large or too small.


I machine bound this little quilt with purple strips left over from another project.


This little quilt measures 36 x 42!

Sharing at Linky Tuesday!

Monday, August 14, 2017

Static Interference {August Stash Bee}

Katrin is our queen for August in the Stash Bee and she requested sections of her self-designed "Static Interference" blocks.

I love to paper piece so I intended to go crazy and make a lot of block sections, however, I was rather limited by the color selections. I only had one dusty purple jelly roll strip that fit her request, and very little aqua -- so I ended up making three sections.


Since I'll be leaving to go on quilt retreat in less than a week (!!!) I'll be taking these to Michigan with me so my mom can mail ours together!

Friday, August 11, 2017

Racing Rails {Moda Bake Shop Pattern}

Hooray! I am so excited to finally be able to share this quilt with all of you. This is my newest project for Moda Bake Shop -- Racing Rails!


While at first glance this might just seem like a run of the mill rail fence quilt -- it most certainly is not! After watching a few different "jelly roll race" tutorials, I thought to myself, "why can't you use this same technique to make strip sets for strip pieced blocks?" I put pen to paper and after quite a bit of quilt math, Racing Rails was born!

You can check out the full tutorial on Moda Bake shop (including lots of tips and tricks from what I learned making the quilt), but I wanted to share the basics here as well.

Using all of the strips from a jelly roll, I made a four strip wide set using a slightly modified version of the jelly roll race technique. The strip set was over 32 feet long! I then cut the strip into the 36 - 8.5" blocks for the quilt as well as 27 - 2.5" x 8.5" strips for the pieced border.


The quilt top has three borders - a small border, the pieced border, and a wide border. I used the same light floral print for the small and large borders.


I used one of the plaid prints for the backing and binding and used a meander with little five-petaled flowers as the quilting motif.


The best part about this pattern is that there was almost nothing left over from the jelly roll! Between the blocks and pieced border, I really made sure to maximize what you could get out of the strips.


I also had a lot of fun taking this quilt to the pond nearby for pictures! It was a little windy, but I managed to make sure it didn't get blown into the water!


Visit MBS for the full tutorial! I'm taking suggestions for what other sorts of quilt blocks could be done with this technique, so send me your ideas!

Sharing at TGIFFFinished or Not Friday, Needle and Thread Thursday, and Finish it up Friday!