Showing posts with label sashing. Show all posts

Monday, June 26, 2017

Gathering Mystery {Quilt Top Construction}

I'm not quite done putting together my Cora's Quilts Gathering Mystery QAL top, but I figured I should give a quick update!

I finished putting all of my blocks together for Week 10, which required lots and lots of pins! I only had one that I partially took apart and fixed! I then quickly progressed into sewing the sashing pieces to my blocks, meaning even more pinning! Pinning made the matching nearly perfect and I think thus far I've only taken out part of one sashing + block combo.


And of course then you pair your blocks...


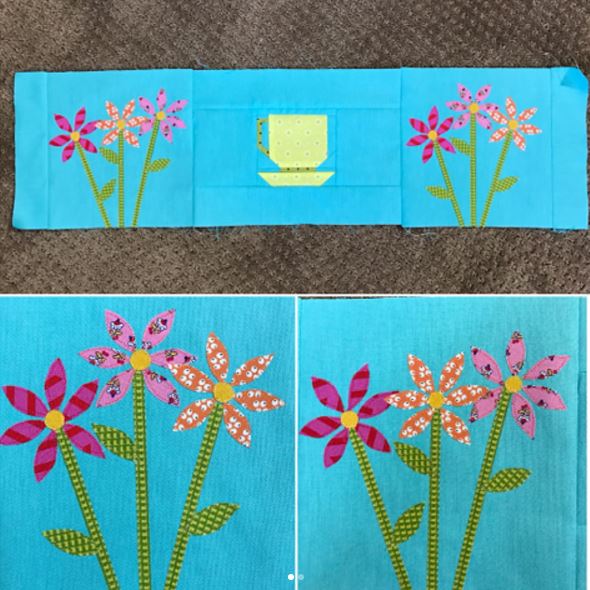
And then you pair your pairs and finish off the row!


Now all four of my block rows are completed! I also completed my horizontal sashing rows. These were much quicker to put together since there wasn't any matching! 


Last night I was able to pin each block row to a sashing row. These are ready to be sewn (and look like almost no easing will be required!) as soon as I can sit down at my machine!


Have a happy Monday! For once, it's not oppressively hot and humid in MD so I am wishing I could be outside!

Sharing at Monday MakingLinky Tuesday, and Let's Bee Social!

Monday, May 15, 2017

Christine's Kitchen QAL {Week 9}

Welcome back to Week 9 of the Christine's Kitchen QAL! Today we're assembling the center of our quilt top! Hooray!

Update: The QAL Is now over and the entire pattern is now available for purchase.


This is a short and simple week -- connect your four rows together and then add sashing to all four sides! The skinny sashing goes on the sides and the wider sashing goes at the top and bottom so that your top will now be ready for the pieced border we will make next week!

Here's my sashed quilt top:


Our winner from last week is Tracy! It seems like quite a few of our "regular participants" didn't post finished blocks from last week yet (frown!) so hopefully this quick week will allow you time to catch up! Here's Tracy's applique blocks!


No giveaways for the next two weeks, but we will have multiple giveaways for those who send in finished quilt pictures for the quilt parade!

Thinking about joining in late? There is still a lot of time to catch up before the final quilt parade in June! 

Tuesday, March 24, 2015

Little Bitty Baby Quilt Tutorial

The last few baby quilts that I have made have all used the same simple layout and I put together a basic tutorial on it to share and share a little bit on the method behind my madness.


I started making simple baby quilts with this setting because you can back the quilt with one single width of the snuggle flannel they sell at Joann, but any fabric wider than 40" will be wide enough to back this quilt with, since the quilt finishes at 39" square. I always found it rather annoying to have to piece a backing for such a tiny quilt, and then have so much left over -- this way the excess backing is reduced.

This is also a great way to use some of those 12 inch blocks you might have left over from swaps or a great way to try out some new blocks! The first two examples above are blocks I made and/or received in swaps in 2014.  The bottom one is one I made from a fat quarter bundle.

You will need:
Nine (9) 12.5 inch (12 inch finished) quilt blocks of your choosing
Sixteen (16) 1.5 inch squares for cornerstones
Twenty-four (24) 1.5 inch x 12.5 inch strips for sashing (one 12.5 inch X WOF strip can cover this)

Lay out your nine quilt blocks as desired.  Sew sashing strips to the sides of blocks to create three (3) rows with four (4) sashing strips and three (3) quilt blocks.


Sew four (4) rows containing four (4) cornerstones and three (3) sashing strips each.


Sew sashing rows to block rows to complete the quilt top. Quilt and bind as desired.


That's it! Short and sweet! 

Sunday, December 29, 2013

Starburst Quilt Along: Finishing up blocks and setting options

The Starburst Quilt Along is now over, but the entire pattern is now available for purchase.

Congrats to everyone who has made it this far!

We have enjoyed putting this together so much! Please let us know if there is any types of patterns or techniques you would like to see in a future quilt along!

Both Amanda and I made throw sized quilts. As per the setting directions, the finished throw size quilt is set on point. For both quilt sizes, there are three different options for sashing and cornerstones: sashing without cornerstones, sashing with solid cornerstones, or sashing with paper pieced corner stones. Amanda and I both chose to sash our quilts with paper pieced corner stones (use up more of that scrap!!) but still end up with very different looks.

I chose to randomly piece my square-in-a-square-in-a-square cornerstone blocks color-wise using three different colors for each square. My inner border is a teal and lime print and my outer border is a tonal purple script print. I used the black background solid for my middle border.


I picked out a large scale floral print for my background from Jennifer Paganelli's Pretty Please line for my background and matched the seam up the middle because I'm a little OCD like that.


Amanda paper pieced square-in-a-square cornerstones and used the background fabric for the outer square so that it blends into the background. She used a red print for both the inner and outer borders and then used a peach for the middle border.

Finished Starburst Quilt

Amanda picked a peach tonal for her background and also made a simple star to use as a label on her quilt.

Starburst Label

Thank you so much for participating with us! Don't forget to add your pictures to the Flickr group and show us your finished projects! We'll do a blog post featuring your finished quilt tops in a month or so, so don't run away just yet!!

Show off all of your finished blocks!!

Saturday, September 14, 2013

Shelves

It's been a long while since I worked on this quilt!

I cut the dark brown shelves for the Harry Potter quilt 2.5" wide from a wood grain fabric from Riley Blake.


Because this quilt is somewhat narrow, I'm planning to do a pieced border on the right and left sides, and then do an outer border with some Fairy Frost in a color to be determined.

Getting closer and closer to being done!

Friday, August 30, 2013

Hey, Good Lookin'

I was getting kind of tired making the Block Bs for my Lazy Sunday Mystery Quilt, so I decided that I would start sashing together the blocks from the center out, and somehow I thought it would make my life more organized. Jury is still out on that one.

Here are the four center blocks prior to sashing:


Sashed together (I am so happy about my tiny medallion cornerstones!):


And here's how far I got before I needed to cut more sashings:


Hooray! I love it so far and I'm happy that I didn't go with a white background for once.