Friday, May 29, 2015

Finished May Wall Hanging

I'm not doing so great getting these done before their intended month starts, but such is life -- it's much better to have it finished!

I took the advice of a number of you that suggested that the border needed a little bit of something added -- so I went ahead and added the three little bug-a-boos that the pattern has, but didn't do any other decorating.


I outlined the bugs in all black, the flower stems in a medium olive, and the flowers are done in red, orange, or yellow -- but contrasting to whatever color piece of fabric it is outlining.


I added another quilting pattern to my repertoire -- a branching vine and leaves. This isn't quite a "meander" because I basically went across the quilt in diagonal lines of vines and leaves and made the leaves close enough together from neighboring branches to make it look continuous. One thing I found out in the process was that after I quilted the main diagonal vine from bottom right to upper left, it was easy to add additional branches on the right of the original branch, but much more difficult to add branches to the left. I guess it's just a directional thing -- working in one direction on one side and the opposite direction on the other.

Here's my little bug-a-boos and some closer-up shots of the quilting.


For the backing I used a large piece that was hanging out in my stash. I honestly can't tell you what it is nor where I got it, but it works well with this project nonetheless. The binding is the same fabric that I used for the flowers' stems and leaves.


Another one done, and on to the next one -- sort of. I'm not 100% thrilled with the June design from the pattern book (ants and watermelon) so I'm going to skip ahead and work on my July one in the hopes of getting that one done before the 4th of July.

Linking up with Crazy Mom Quilts and Free Motion Mavericks!!

Don't forget that the next Row QAL tutorial will be posted on Monday and to follow Honey, Bunny, and Doll on Pinterest!

Tuesday, May 26, 2015

QST progress and block building

Since I got both sets of my HSTs done for my Romantic Garden quilt done (YAY!), this weekend was the time to start working on getting my QSTs (at least the first set of them!) built.

I had gotten the pairs sewn together the same time as all of my HSTs and got them cut apart. I didn't trim just yet so I had as much wiggle room as possible to properly center the "X" of the QST block.


When I make QSTs, I do not cut corner to corner -- if you do this, you might end up with triangles that aren't right angles at the center! I make sure to cut perpendicularly to the seam and align it with as close to the opposite corners as possible without distorting the cut from being perpendicular to the seam.


Here's all of my QSTs pressed but before trimming.


I trimmed all of these while watching baseball on Sunday. One of the nice things about HSTs vs. QSTs is that at least some of the time you can get away with only trimming two of the sides if you have one "square" side to start. With QSTs you have to trim all of the sides and worry about making sure that your block center stays in the center once it's trimmed.


I don't have a 3 inch square ruler to easily trim, but I was able to line up the center of the block with an "intersection" on the ruler and then line up the diagonal of the QST with the diagonal of the ruler. And ta da --- 52 QSTs!


I went ahead and cut the 3 inch squares for the rest of block A (this is a two block quilt) and laid out one entire block to see how it will look.


I think it looks a little bit like a four leaf clover in the center with the dark greens. Now to sew all of them together!

Linking up at Linky Tuesday, Fabric Tuesday, Let's Bee Social, and WIP Wednesday!

Don't forget that we are nearing the end of our Row Quilt QAL! There's still plenty of time to participate!

Saturday, May 23, 2015

Honey, Bunny, and Doll on Moda Bake Shop!

I am so excited to share that Honey, Bunny, and Doll has its FIRST pattern on Moda Bake Shop!

Introducing Pixie Sticks!


Amanda designed this quilt and made it out of True Luck by Stephanie Ryan. The individual blocks are simple -- the orientation vies you this fun interlocking pattern!


We hope that you enjoy the pattern and that you make a version for yourself! Go here to get the tutorial!


Happy Saturday!

Friday, May 22, 2015

Pattern Premiere: Dashing to the Chapel

I am SO excited to share that the quilt that the quilt that I helped make as a wedding present for my sister has been made into an AMAZING pattern!


Since it was originally a wedding quilt, we decided to call it "Dashing to the Chapel". The quilt is made up of all churn dashes -- in three different sizes. Some of the large blocks have little bitty 4 inch churn dashes nested inside!


We used the Modern Roses collection to make the quilt and we can't wait to see how you all take it and make it your own! It's perfect for a fat quarter bundle, but a scrappy version would also be amazing!
This pattern is currently on special for only $5 for a short while longer -- get it while it is on sale! You can snap it up on Etsy! Don't forget to pick up your background and backing fabric from us too!

PS. Come back tomorrow because there may or may not be a new FREE HBD quilt design being published!

Wednesday, May 20, 2015

WIP Wednesday: The One With All the HSTs

In the wake of finishing my Lazy Sunday quilt, I thought I might as well start on another queen sized quilt for myself. Sound logic, right?

I actually received this fabric as a birthday gift a long while back (aka before I started this blog!) and spent a long time looking for the right pattern for it.


(I will update this with a better picture when I get home -- this is an old, old picture!)


So rather than being nautical, mine will be a romantic garden quilt. I did realize that the red in the fabric set I had was too true red -- all of the rest of the fabrics have a ruby red/dark pink and so I'm going to go on a search to find something to replace it. I will probably look for another tonal, but I don't think I am going to use it in the "body" of the quilt.

So this is where I am with my progress:

In the effort of trying to be a good wife, I decided that I would do all of the initial cutting and sewing of my HSTs and QSTs this past weekend while my husband was at work and that this week in the evenings I would iron and trim them and not have to interrupt Criminal Minds with the sound of the sewing machine. (Priorities.)


Really, no matter what order I make the HSTs, they all need trimmed and pressed. I was able to cut all of the starting squares for all of my HSTs (almost 200 of them!) and my QSTs and get them sewn into their pairs.

Last night I got the first combination (pink + green florals) cut apart and pressed.


There's 104 HSTs between those two piles! (And for me to trim tonight and tomorrow!) It's funny how the first part of the pile is neatly stacked and then as you get further and further along the pile gets more and more disastrous.


I'm fully intending this to be a longer-term project just so that I can pace myself with all of the HSTs and QSTs. Since this is for me, there's no deadline and so it'll take as long as it takes.

Linking up with Freshly Pieced! 

Monday, May 18, 2015

QCQAL 2: Row 6: Birds in the Air and 6 inch row link-up

It's time for Row #6! This time we are making Birds in the Air blocks. Don't forget to come back and link up pictures of your 6 inch block rows (and your other rows if you haven't done so already!)


Because this block uses an odd number of "parts," this tutorial (unlike the rest in this series) is written to make a pair of Birds in the Air blocks. For a throw sized quilt you will need to make 8 blocks (4 pairs) and for a twin sized quilt you will need to make 12 blocks (6 pairs).

For two blocks, you will need:
One (1) 6 7/8 inch square cut diagonally once (yielding 2 triangles)
Three (3) 3 inch squares for HSTs
Three (3) 3 inch background squares for HSTs
Three (3) 2 7/8 inch background squares cut diagonally once (yielding 6 triangles)


For a throw sized quilt you will need:
Four (4) 6 7/8 inch squares cut diagonally once (yielding 8 triangles)
Twelve (12) 3 inch squares for HSTs
Twelve (12) 3 inch background squares for HSTs
Twelve (12) 2 7/8 inch background squares cut diagonally once (yielding 24 triangles)

For a twin sized quilt you will need:
Six (6) 6 7/8 inch squares cut diagonally once (yielding 12 triangles)
Eighteen (18) 3 inch squares for HSTs
Eighteen (18) 3 inch background squares for HSTs
Eighteen (18) 2 7/8 inch background squares cut diagonally once (yielding 36 triangles)

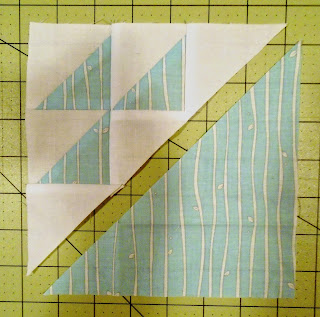
Using your 3 inch squares, make HSTs pairing together your focus and your background fabrics. Trim to 2.5 inches. For each pair of blocks you will make 6 HSTs -- 3 HSTs for each block.


Lay out your block as shown below.


Sew together your small triangles and HSTs together to form a larger triangle unit. I found it easiest to sew the three HSTs and the center triangle together like a four-patch and then to sew the other two triangles on. Remember to watch your triangle and HST orientation and to trim off your dog ears as you go!


Sew your large triangle to your HST/triangle unit to finish your block.


I made my blocks in three different colors -- four in each color. Here are all 12 of my blocks.


(Note: for those of you making twin sized quilts, you do not need to make a third 6" row -- you only need two!)

Link up your 6" block rows!

Friday, May 15, 2015

Lazy Sundays Quilt -- Blogger's Quilt Festival

I really need to keep better track of my projects' statuses because this baby has been sitting quilted for months in our apartment and it only needed the binding put on it! Embarassing! Based on the last time I posted about this quilt, it looks like I finished the quilt last January, sent it to the long arm quilter with my mom one of the times she visited in May or June last year, and she brought it back to me when she came in November for Thanksgiving and has been sitting in my sewing space just waiting for me since then. Alison, get your life together!

I'm also sharing this quilt as a part of the spring Blogger's Quilt Festival in the Large Quilt Category!

Anyways, while my mom was here visiting, I was able to get this baby bound and put on our bed! Without further ado...


This quilt came from one of Bonnie Hunter's mystery quilts in Quiltmaker magazine with some modifications. This was a twin sized pattern and I added extra wide borders on two sides to make it more square for a queen sized bed. Here are all of the previous posts on this quilt.


100% of the fabric used for piecing the blocks came from my stash! The periwinkle print is Basic Grey but I couldn't tell you the line, the pink print is from the Somersault line, and the peach background is from the City Girl line. The rest I have no idea! Everything was pulled to work with the periwinkle print which I had three yards of!


The binding is a smaller scale flora Moda print (don't know the line off the top of my head) that I had originally bought as a backing for another quilt but wasn't big enough for that project. This is the first large quilt that I've bound completely by machine! The last large quilt I finished was my argyle quilt, but I hand finished the binding for that one.


The quilting is a scroll-type pantograph design that is called "fleur de lis" -- to me it doesn't look like a fleur de lis but whatever. It looks like curly clouds to me. The backing is extra wide off white backing fabric and hopefully you can see the quilting a little clearer on the back than on the front.


This quilt has already taken up residence on my bed! It's a good feeling to make a "stash quilt" where the only things specifically purchased for this project were the batting and the backing!

Stats:
Name: Lazy Sunday
Size: 95 inches square
Fabrics: noted above, all from my stash other than the backing
Quilting: pantograph fleur de lis
Started: August 2013
Finished: May 2015
Category: Large Quilts


Wednesday, May 13, 2015

Burlap Brights Blog Hop and Giveaway!

Update: The giveaway is now closed -- thank you to all who entered!

Today I am guest posting over at Sew in Love with Fabric as a part of Benartex's Burlap Brights Blog Hop!  Welcome to any new visitors coming over from the blog hop -- I hope you stay a while!


Benartex sent me a mini bundle of six fat quarters of their new line of Burlap Brights fabrics to design a block as a part of their blog hop (which started Monday and runs through the 21st!). While I am not a big fan of burlap in the traditional sense, I definitely liked working with these fabrics!


I decided to design a rainbow star and it draws inspiration from two of my favorite blocks -- Ohio star and weathervane!


Here's the whole schedule of who is participating and links to their "home" blogs -- I can't wait to see Jessica's block! 

Burlap Brights Block Hop Schedule:
May 11: Chris from Made by ChrissieD
May 12: Mary from Mary on Lake Pulaski
May 13: Alison from Little Bunny Quilts
May 14: Debby from Debby Kratovil Quilts
May 15: Kristen from KD Quilts
May 16: Benartex design team
May 17: Stephanie from Stitched Together Studios
May 18: Julie from The Crafty Quilter
May 19: Cynthia from Quilting Is More Fun than Housework
May 20: Jessica from Quilty Habit
May 21: Wendy from Ivory Spring

And now for the fun part! I get to give away a bundle of 6 fat quarters of the Burlap Brights to one lucky reader! 

To enter:
1. Leave me a comment with your favorite color of the Burlap Brights line. Click here to see all 26 colors!
2. Followers -- new and old! -- of Little Bunny Quilts get a second entry -- just let me know how you follow me!

Remember, you cannot win if I cannot contact you! Click here to find out how to fix that problem!

Don't forget to check out all of the other tutorials in the blog hop and to come back here on the 1st and 3rd Mondays of May and June for tutorials for my row quilt QAL!

Tuesday, May 12, 2015

Stitching and Shopping

My mom came down from Michigan to visit for a few days, so I took Thursday and Friday off of work and we did some mini-shop hopping in my area and attempted to visit 5 quilt shops in over the course of three days. Attempted being the operative word. Google Maps sent us to the completely wrong place for one and we gave up on it (but we'll get there the next time!) and one shop had closed completely but it still had it's old address up on its Facebook page and no clear "hey we're closed!" message on the page.

In any case, I did my first fabric shopping in nearly a year! I got backing for my Stash Bee Star quilt from Traditions at the White Swan, I bought the rest of a bolt of an amazing bold floral print that I'm going to have to design a quilt around from Patches Quilting, and I got a few coordinating fabrics from Capital Quilts to start a new project.


I also got the satin stitching on my May wall hanging done -- at least for the flowers. I'm still not sure if this should have decorations in the border or not. Thoughts? Part of me thinks that maybe it should have a little something to break up all of the green, but not sure what exactly to do!


I also finally got some more Kona Champagne to get the top of my QCQAL quilt from last year together! Here are all 25 of my blocks laid out:


And here are all of my blocks sashed together!


I put sashing fabric on two sides of each block and alternated which two sides had the sashing to make it look like the blocks are floating semi-randomly and not just perfectly aligned with one another in columns and rows. I am SO happy with how this turned out. I need to add one border of the Kona Champage all the way around the quilt and then it will be ready to be quilted! I haven't decided if I want to quilt this one or if I want to have it done elsewhere. I think the quilting should be simple but not sure the best way to go about doing that.

Linking up with all of the normal Tuesday/Wednesday places!
Sew Cute Tuesday
Linky Tuesday
Fabric Tuesday
WIP Wednesday

Don't forget to check out my Burlap Brights blog hop post and to enter to win a rainbow fat quarter bundle of Burlap Brights! And stop back by for the QCQAL 2 tutorials!

Wednesday, May 6, 2015

Sew Mama Sew Giveaway Day May 2015

Hello and welcome to Little Bunny Quilts!


I'm Alison and I have been blogging here for almost 4 years (holy wow!) and work with my mom and my sister to design patterns for Honey, Bunny, and Doll Designs! Here's a smattering of what I've been working on in the last year ... if you care to peruse!


Now on to why y'all are really here!

Up for grabs for our grand prize winner is a Kona Jelly Roll!


It's a gorgeous blend of rainbow colors for a fun summer project!

And wait, there's more!

FIVE runners-up will be able to pick their choice of patterns from the Honey, Bunny, and Doll Pattern Shop!


BUT WAIT! If we get over 600 likes on the Honey, Bunny, and Doll Facebook page, the number of pattern winners will double to TEN!

To enter:

1. For one entry, leave a comment with a quilting project that is on your "bucket list" -- mine is a double wedding ring quilt!

2. For a second entry, if you are some sort of a follower/liker of Little Bunny Quilts and/or Honey Bunny and Doll Designs, let me know how you follow/like us -- follow on Blogger/Bloglovin, like on Facebook, etc. 


Monday, May 4, 2015

QCQAL 2: Row 5 -- Pinwheel Star

We are halfway though the QAL already, how did that happen?


This week we're going to be making pinwheel star blocks! This is a block with a lot of variations -- the way you choose to color it will determine what your final block looks like! This block is entirely half square triangles -- and small ones at that -- so it might be best to work on this one in small batches as to not drive yourself batty.

Remember that you will need to make 8 blocks for a throw and 12 blocks for a twin sizes quilt!

For one block you will need:


For a throw sized quilt you will need:
Thirty two (32) 2.5 inch squares in pinwheel color A
Thirty two (32) 2.5 inch squares in pinwheel color B
Sixty four (64) 2.5 inch background squares

For a twin sized quilt you will need:
Forty eight (48) 2.5 inch squares in pinwheel color A
Forty eight (48) 2.5 inch squares in pinwheel color B
Seventy two (72) 2.5 inch background squares

This block is highly reliant on making accurately sized HSTs! Do not forget to trim!

Pair up each colored square with a background square and make HSTs. Trim each HST to 2 inches square. For each block you will need eight (8) background/color A HSTs and eight (8) background/color B HSTs.


Lay out as follows and sew together.


And here's my finished block!


And here are all 12 of my pinwheel star blocks!


See you in two weeks for our next tutorial!