Showing posts with label small projects. Show all posts

Monday, September 21, 2020

Bag Lady {Two More Finished Open Wide Bags}

Since I had enough notions -- with the exception of zippers -- to make a few more Open Wide bags, I bought a few more zippers and got to work.

The first one that I made is the same three fabrics as the large pouch that I made in the original set, just in the smallest size. I used all of the same colors of thread for quilting and construction so that these are a matching set. 


For the second, I made a medium sized bag using only two different fabrics instead of three. I used the same fabric for both the lining and the accent fabric for this bag and skipped the mesh pockets.


I also cut the pieces and parts for a large sized bag to match the original medium sized bag that I made, but I'm not sure when I'll tackle that project. I'm going to try to get some actual quilt tops finished over the next month before baby arrives -- I actually have a finished top to show you later this week!

Happy Monday -- what are you working on today?


Thursday, September 10, 2020

Open Wide 2.0 Bags in Floralicious {It's In The Bag Blog Hop}

 Today is my day to share for the It's In The Bag Blog Hop, sponsored by Island Batik and By Annie!

The collection I got to use for my project is the new Floralicious collection!

If you remember back to my unboxing post from this summer, I got all of the pieces and parts to make a set of the Open Wide 2.0 bags from By Annie!


I have long avoided three dimensional sewing, but this was my chance to try something totally new and I am so happy with how the bags turned out!


I started with the largest size bag and worked my way through one entire bag before starting on the next one. I used a lot of different colors of Aurifil thread too! Each bag had a main color, lining color, and accent color designated for each particular size.


I free motion quilted meanders for all of the bags. It was a different feeling for sure quilting the foam stabilizer rather than batting! 

I had never ever sewn a zipper before so that was also a big adventure! I really appreciated how clear the directions were in each step -- especially for someone with a fear of three-dimensional sewing and zippers like me!


One very nice aspect of these bags is that they perfectly nestle inside of one another for storage if you make yourself the entire set! 

Now I am totally addicted to the idea of making more of these bags as gifts! I have quite a bit of fabric and supplies left over other than the zippers, so I am going to have to buy some more zippers to make more of these bags (maybe in some sets!)

Thank you to Island Batik, By Annie, and Aurifil for graciously supplying the supplies for this project! I had so much fun making these and if you are like me and things like zippers freak you out -- definitely try out a By Annie's bag pattern!


Wednesday, July 15, 2020

What I've Been Sewing Lately {WIP Wednesday}

Despite the fact that I have been working from home for four months as of tomorrow, that has not translated at all into extra sewing time. It's mostly translated into sleeping more and loading and unloading the dishwasher more. And we may or may not have made it through the entire Marvel movie series in that time. 

The goals in my sewing room have been two-fold since the beginning of the year: finish up WIPs and clear out scraps. The finishing up WIPs part has been wholly unsuccessful. The clearing out scraps part has actually gone relatively well. I haven't made any lately, but early on in quarantine, I made oodles of my Rainbow Snippet blocks

I haven't really posted about it but I have actually been making masks. I've made four "batches" -- the first batch was for us, a few of my husband's coworkers, and some friends, the second was a batch for our church when they reopened for socially distanced services, and the third and fourth batches have been for my work. I've used the Sarah Maker tutorial with ties for all of them, but usually I make my ties slightly shorter.


This has been a great medium-to-large scrap buster. I've pulled the majority of my fabrics from my "larger cuts" scrap bin and just tried to maximize what I can get out of the scraps.

I also started a new scrappy project using some Island Batik fabrics and my Accuquilt cutter. I still had most of the scraps left from my Hip to Be Square quilts from the Little Sir, Little Miss line (other than the pink and purples I pulled out to make my Hattie's Choice quilt a few months ago) and combined that with the black solid Island Batik fabric I had on hand for the background. The inspiration for my quilt is this pattern that is featured in the Accuquilt book that came with my starter set last year:


I'm not sure if I will do the borders as the pattern shows, but for now, I cut all of my blue and teal scraps into pieces and parts for flying geese for the star points and the rest of the colors (other than the green, which I am reserving for now) into squares for the four patches. The other change is that the pattern is actually for the 6" Qube set and I have an 8" Qube set so I am not really going off yardage, I'm just starting with this general idea for a a two block quilt.

I have all but four of my flying geese sets complete (at least of what I have cut thus far):


I've also made quite a few four patches that will become the centers of my star blocks:


The four patches will also be part of the secondary block for this quilt, which I have seen called by many names, including a "Frayed Four Patch". To me it's kind of like a mini Irish Chain block or a really small Courthouse Steps block. Some of my small squares will be used for the corners of these blocks so I can't just mindlessly turn all of them into four patches! I also realized that I need to cut some black small squares for the corners of my star blocks, so that will be my next task.

Now that I am finally in a better mind for sewing, it figures that I am going back to work on site (part time) starting next week! I still need to decide on my project for this month's Island Batik assignment, but I have a few good ideas! I'll be using the same fabrics that I used for my May project (I think) to make a wall hanging (I think).

Thursday, May 21, 2020

Ultimate Home Decor Blog Hop {Winter Forest Placemats + Giveaway}

Today is my day to share on the Ultimate Home Decor Blog Hop with Island Batik!


The collection that I have been sewing with is Winter Forest!


I have really enjoyed the fun wintry prints in this line!

Here are all of the fabrics in the bundle I received:


For my project, I cut 3.5" strips of each fabric to make strip pieced patchy placemats. I used the equivalent of 24 - 3.5" squares in each placemat top in a 6x4 arrangement.


I was actually able to cut enough from my strip sets to make six placemats plus a little extra! Here are the first four placemat tops sewn up and ready to be quilted!


For all of the placemats, I used the same light snowflake print for the backing and the blue bear paw print for the binding. For the quilting I used a light grey Aurifil thread to quilt meanders across each placemat. For the binding, I used the same grey thread in the bobbin, but used a cobalt blue 28 wt. Aurifil thread to do the final binding top-stitching.


While this set of wintry placemats won't get used right away, I definitely will be making more placemats this quick and easy way!

And now onto the giveaways! Hooray!

Island Batik is currently hosting *TWO* giveaways via Rafflecopter on their blog. Click here to visit their blog and enter! This giveaway closes TOMORROW, May 22nd.

I am hosting a giveaway of 5" strips of the Winter Forest line!


There are twenty 5" strips (one of each fabric in the line). As usual, leave comments for entries and make sure to complete all of the options for entries!

1. Leave one comment telling me your favorite line that has been featured in the Ultimate Home Decor Blog hop. All of the lines are featured in this blog post.

2. Leave me a second comment telling me if you follow Little Bunny Quilts/Honey, Bunny, and Doll Quilts and how you follow: this blog, our Facebook page, our Etsy page, our Payhip page, my Instagram profile, and our HBD profile.

3. For a super bonus third entry, tell me which of my other Island Batik projects from this year is your favorite:

Make sure to check out all of the other projects featured in the blog hop!

Tuesday, April 21, 2020

Scrappy Sewing {Flannel Burp Cloths}

As I mentioned in some of my recent posts, one of my sewing goals for The Great Stay Home Marathon is reorganizing my sewing room. I use flannel for backing baby quilts, but I often end up with flannel scraps that I don't know what to do with a lot of the time. However, there is another impending baby boom in my circle of friends (four babies between June and November!) I decided to pull out the flannel scraps and make some really simple burp cloths.

There are a lot of different burp cloth tutorials out there and I reviewed quite a few before starting. I ended up making mine slightly smaller to be able to cut more rectangles out of the fabric -- 9.5" x 14" is the final measurement I used.


I did not get overly fancy with contrasting fabric and made each one with the same fabric on both sides. I sewed the rectangles right sides together on three sides, turned it inside out and then top stitched the entire thing to close the final seam.


Out of the first batch of fabric, I made four girly ones and four gender neutral ones. I have a bit more of another grey flannel print to make a few more before all of these babies start showing up.

Happy Tuesday! What are you sewing this week? Are you working on sewing room organization like me?

Our Etsy shop still has plenty of solid fabric in stock if your local quilt store is closed! We are shipping out packages on a regular basis!

Wednesday, January 22, 2020

Blue Moon {Winter Blues Blog Hop}

Today I am participating in the Winter Blues blog hop hosted by Carla at Creatin' in the Sticks...


...and I am sharing a scrappy project for my Island Batik Ambassador project for January!

As an Island Batik Ambassador, I am provided with samples of various lines of Island Batik fabrics, Aurifil thread, Accuquilt products, and Hobbs Batting to use and share with you!


For my project, I decided to play with the scraps I had left over from the Starburst wall hanging I made for my August Island Batik Ambassador project. I had a quite a few of the 2.5" strips left over from the Sand Bar strip set and focused on using these for my project.


For a while, I have needed to make a new set of placemats -- one set that had six placemats instead of my usual four. Four is usually an easy number to make because you can use a single yard of fabric to back all four placemats and usually I don't need more than four. However, now that we are living in a house instead of an apartment (and I very much enjoy being the hostess with the mostest) I need at least one set of 6 placemats.

I used a modified version of the "jelly roll race" technique to make the base of my placemats. All together, I used about 20 strips. To begin, I sewed all but two of my 2.5" strips together on the diagonal (like you'd join binding strips) and pressed those seams open. I sewed my strip set in half three times so that my strip set was eight fabric strips wide and about 80"-85" long and then added one more 2.5" fabric strip so that my strip set was nine fabric strips wide. From there, I subcut my strip set in to six rectangles, 18.5" wide and 12.5" long.


Some of my subcut rectangles have more color changes than others, but this was much faster than trying to piece each one individually!

Next, I quilted each placemat -- I used two different fabrics for the backings, the navy/teal feather batik and the light blue cheerio print. I used the same teal variegated Aurifil thread as the top thread for all six placemats, however, I used a bunch of different colors in my bobbins to use up bobbin scraps! I used navy, emerald green, light teal, and even a bit of purple!


These pictures show the placemats before trimming -- I roughly cut the backing and the batting for each placemat before I quilted it. And in the effort of using scraps, I also used scraps of Hobbs batting left over from previous Ambassador projects in these placemats. I had some larger scraps that I used for four of them and then pieced scrap battings for the final two placemats.


Since I know these will be going through the washing machine and used repeatedly, I'm not too concerned about the backings not all being the same -- and the same for the binding! I used three different fabrics for the bindings. For placemats, I always sew my bindings completely by machine.


Now my table is ready for my next dinner party!


Make sure to check out all of the other bloggers hopping today and check out the full schedule on Carla's blog!

Wednesday, January 22nd


Thank you for visiting Little Bunny Quilts and please follow me in whatever way you prefer!

Monday, December 9, 2019

Jelly Glazed Hearts Tablerunner {Fat Quarter Shop Hop}

Today I am participating in the Jelly Glazed Hearts tablerunner blog hop with the Fat Quarter Shop! Check out their post on the Jolly Jabber here!

For this project, I picked a mini jelly roll of the new Alma line from the Ruby Star Society and picked one of cream prints for the background fabric.


I picked out eight strips from the jelly roll for my blocks and paired them up.


Next came chopping my strip sets into the correct lengths for each block.


Then I made the heart blocks and added the setting triangles to each block.


This is a really, really long table runner!


I used backing from my stash and quilted this runner with leaves and swirls. I used six of the remaining jelly roll strips to make a scrappy bias binding. (I used this tutorial as my guide.)


This runner is actually just a little bit too big for my table (go figure) so this will likely become a gift!


Check out the other Jelly Glazed Hearts runners on the Jolly Jabber! Get the pattern here! There is also a YouTube video!

Sharing at Wednesday Wait Loss and Needle and Thread Thursday!

Thursday, December 5, 2019

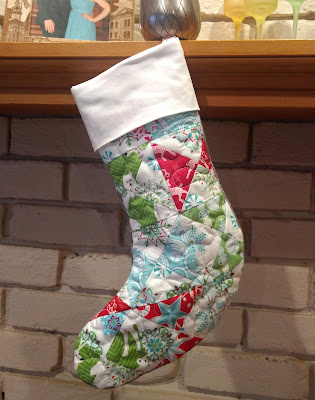
Patchwork Christmas Stocking Remix {Fat Quarter Shop Fun}

Today I am participating in the Fat Quarter Shop's "pattern remix" for their Patchwork Christmas Stocking pattern!


Click here to see the original post and pattern! Click here to check out the other "remixes" of this pattern!

For my stockings, I used the same instructions with the exception that the pieced and quilted part of my stocking uses slightly larger quarter square triangles made from charm squares rather than half square triangles.


For my fabrics, I used an older set of 5" squares from my stash featuring the older Amanda Murphy line, Nordic Holiday. My background fabric is from her Twinkle line.

Instead of using fusible fleece, I used scrap batting and quilted my stocking front.


I quilted it with meanders and snowflakes. I then used the template to trim my stocking front to size.


For the rest of the fabric of the stocking, I used some scrap flannel that I had on hand.

I used half of another charm square for the hanging loop. Finishing this up was pretty easy -- despite my trepidation about three-dimensional sewing!


My husband has given his stamp of approval and so I have been tasked with making another matching stocking, as well as two mini stockings for our rabbits!

Make sure to check out the other bloggers participating in the hop today!