Sunday, December 29, 2013

Starburst Quilt Along: Finishing up blocks and setting options

The Starburst Quilt Along is now over, but the entire pattern is now available for purchase.

Congrats to everyone who has made it this far!

We have enjoyed putting this together so much! Please let us know if there is any types of patterns or techniques you would like to see in a future quilt along!

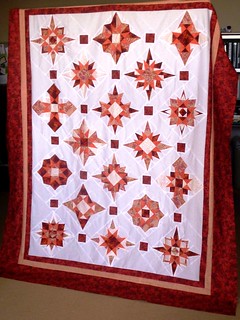
Both Amanda and I made throw sized quilts. As per the setting directions, the finished throw size quilt is set on point. For both quilt sizes, there are three different options for sashing and cornerstones: sashing without cornerstones, sashing with solid cornerstones, or sashing with paper pieced corner stones. Amanda and I both chose to sash our quilts with paper pieced corner stones (use up more of that scrap!!) but still end up with very different looks.

I chose to randomly piece my square-in-a-square-in-a-square cornerstone blocks color-wise using three different colors for each square. My inner border is a teal and lime print and my outer border is a tonal purple script print. I used the black background solid for my middle border.


I picked out a large scale floral print for my background from Jennifer Paganelli's Pretty Please line for my background and matched the seam up the middle because I'm a little OCD like that.


Amanda paper pieced square-in-a-square cornerstones and used the background fabric for the outer square so that it blends into the background. She used a red print for both the inner and outer borders and then used a peach for the middle border.

Finished Starburst Quilt

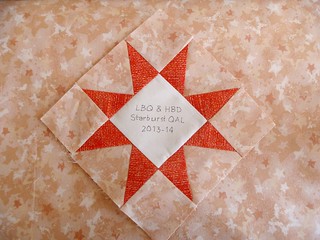
Amanda picked a peach tonal for her background and also made a simple star to use as a label on her quilt.

Starburst Label

Thank you so much for participating with us! Don't forget to add your pictures to the Flickr group and show us your finished projects! We'll do a blog post featuring your finished quilt tops in a month or so, so don't run away just yet!!

Show off all of your finished blocks!!

Monday, December 23, 2013

Starburst Quilt Along Week #9: Block #9 and Block #8 Link Up

The Starburst Quilt Along is now over, but the entire pattern is now available for purchase.

We're here! It's the last block!

Thanks for sticking with us thus far with our first (and certainly not last) quilt along!

This one has lots of places to use up any small leftover pieces that you might have!

Any questions, concerns, or comments? Head on over to the Flickr group and share your progress!

Here are my last two blocks!


Watch for a post on our finished quilt tops and setting options next week!

Monday, December 16, 2013

Starburst Quilt Along Week #8: Block #8 and Block #7 Link Up

The Starburst Quilt Along is now over, but the entire pattern is now available for purchase.

First, I just wanted to say THANK YOU to everyone who has participated thus far. It has been so much fun seeing all of your blocks on your blogs and in the Flickr group:


Look at all of that quilty inspiration!

Secondly, only one more block next week! The time has simply flown by!

Now, on to more pressing matters: block #8!

Here are my two blocks:


If I had these to do over again, I might rethink the placement of the darkest purple in my blocks -- at least under the lighting conditions these pictures were taken, the purple ends up fading into the black. 

Saturday, December 14, 2013

Giveaway Day Winners

Our winners are...


...which is Rosa!


...which is Kathy!


...which is Schatzi!

I've emailed all of you and need your addresses ASAP! Thanks for participating!

Monday, December 9, 2013

Sew Mama Sew Giveaway Day

***The giveaway is now closed!!! Thanks to everyone who entered! Winners will be announced soon!***

It's the most wonderful time of the year --- Giveaway Day (week) at Sew Mama Sew!

(What, did you think I was talking about Christmas?)

This year I have not one, not two, but three stash bags to give away!

The first is green:


The second is blue:


The third is brown:


To enter to win:
1. Leave me a comment with your favorite quilt block. Links to tutorials are encouraged!
2. Leave me a comment if you are a follower and tell me how you follow (Blogger, Bloglovin, Email, etc.)

Contest will close on December 13th at 8 PM EST (5 PM PST) and the winner will be announced shortly thereafter! The winnings will be sent out as soon as I get addresses from the winners!

(While you're here, check out the Starburst Quilt Along hosted in conjunction with Honey, Bunny, and Doll Patterns! There is still plenty of time to participate -- and anyone who finishes their blocks by January 15th will get free setting directions for a wall hanging or a throw sized quilt!)

Good luck and go enter all of the giveaways at Sew Mama Sew!

Sunday, December 8, 2013

Starburst Quilt Along Week #7: Block #7 and Block #6 Link Up

The Starburst Quilt Along is now over, but the entire pattern is now available for purchase.

I can't believe we only have two more blocks to go!

This week is Block #7. This one is a good one to show off some of your larger print fabrics if you're working with any.

Here are my two blocks:


This one has pretty easy piecing -- I know a number of people are a few blocks behind, so this week is a good week to catch up!

Weekend Piecing

I started putting together some of the blocks that I have received thus far from being the Queen Bee in the Stash Bee last month. I have a few more that are currently on their way to me so I will finish piecing it all once I receive all of them.

Here's 16 blocks put together thus far:


I can't wait to get the rest of them and put it all together! I will end up with at least 36 blocks -- so this one will end up pretty large! I am planning to make it into a picnic and beach quilt. :)

I finally added the side borders to the Harry Potter paper pieced quilt. I strip pieced the two side borders from 5 strips of light and dark brown fabric and then sewed them together staggered to make the final diamond like pattern. I am very happy with it and probably won't add any more borders to it. Now it just needs quilting! Hooray!


Here's a close up of the trimmed and sewed side border. The way that I cut and sewed the two wood grain fabrics together ended up with the light grain going one way and the dark grain going the other so that they look woven! Hooray for happy accidents!


Happy Sunday to you all!

Friday, December 6, 2013

Finished NuBees Quilt

Last year, I participated for a few months in the NuBees swap on Flickr and I just now have gotten my quilt finished.

One of the perks of being married is having someone to hold your quilts -- especially when it is rainy and gross outside.


And here is the pieced backing that I put together using just my stash! I love being able to do that.


This was long arm pantograph quilted with a large meander -- here are my two favorite blocks!


The cross block on the right is also my husband's favorite block.

I bound this quilt with a half yard of Posh by Chez Moi that I've been hoarding for ages. Originally I planned to do a scrappy binding, but it just needed some more brown in the mix and this fabric fit the bill perfectly.


Thanks to everyone who participated in making this quilt happen, especially Kim @ Crafternoon DelightMarla @ Sew Hungry, and Anne @ Play Crafts!

Sharing over at Crazy Mom Quilts!

(Don't forget to check out the Starburst Quilt Along -- still lots of time to join in!)

Wednesday, December 4, 2013

WIP Wednesday: What to do...

I haven't really had a lot of time to post things other than the Starburst QAL posts lately, and that has made me sad, so I figured I would do a WIP Wednesday update post.

I've gotten the top of my Lazy Sunday Mystery quilt together:


The intent was that I would add another row of blocks on each side to make it square and then add borders to make it queen size, but alas, I am out of the dark blue fabric and not sure whether to make a twin size as the pattern directs, quilt and bind as is for a large throw, add chunks to make it queen sized, or something else entirely.

So this WIP goes back on the shelf. Sigh.

I did get my Nubees swap quilt back from my mom who had taken it to the long arm quilter at home and sewed the binding on it. (I'll try to add a picture later). That I should be able to finish this week. I am very much in love with how it turned out and I can't wait to share it!

Linking up to Freshly Pieced!

Monday, December 2, 2013

Starburst Quilt Along Week #6: Block #6 and Block #5 Link Up

The Starburst Quilt Along is now over, but the entire pattern is now available for purchase.

Can you believe we're already more than half way through the quilt along? It's gone by so fast!

Here are my two blocks:


And once you finish these, only three more patterns to go!

Monday, November 25, 2013

Starburst Quilt Along Week #5: Block #5 and Block #4 Link Up

The Starburst Quilt Along is now over, but the entire pattern is now available for purchase.

Once you finish this block, you'll be more than halfway done with all of the blocks from this quilt! Hooray!

This week's block also has a "swirling" effect, but all of the coloring is the same for each type of block. WHEW! Same notes as usual for this block: don't forget to print your paper piecing patterns full scale without fitting to page!

Here are my two blocks:


Don't forget to come back and link your #4 blocks here and to share any and all of your progress on the Flickr group!

Monday, November 18, 2013

Starburst Quilt Along Week #4 -- Block #4 and Block #3 Link-up

The Starburst Quilt Along is now over, but the entire pattern is now available for purchase.

It's week four everyone! I am LOVING all of the pictures of blocks that people are linking up and adding to the Flickr group! Keep adding them and don't be afraid to jump in if you haven't started yet! You will definitely be able to catch up!

This week, we have another non-symmetrical block. This one is a little bit more complex than Block #3, so I will try to explain how to think about your color placement.

You will end up with 4 - A pieces, but 2 - A pieces will be using the "light purple" (or whatever you've chosen) for the larger triangle, and 2 - A pieces will be using the "light yellow" for the larger triangle. Same thing goes for the B pieces -- you end up with 4 total, 2 each of 2 different colorways.

Here are my 4 - A pieces and 4 - B pieces laid out so that you can visualize what you need to make:


Not sure what is up with the awful lighting in these photos, but that is actually the lime green in the corner pieces.

So once you have your pieces, you will put them together so that it ends up with a "whirling" effect.


Here is my other block:


Good luck with your Block #4! Head on over to the Flickr group if you have questions!

Tuesday, November 12, 2013

Stash Bee November 2013 -- My turn!

It is the last month of the first round of the Stash Bee and if you are interested in signing up for next year (rounds will be by year starting in January) the sign-ups are here!!

This month it is finally my turn to be the Queen Bee for the month!

I chose to use Jess's Moda Bake Shop Pattern Simply Woven tutorial with apple green, shades of yellow, and bright orange as my colors.

These are my test blocks from a while back that I didn't want to share until now!


I got my first three swap blocks on Saturday and it is so exciting to see what others have made! When I get a few more blocks I will share all of the ones I have received.

Happy Tuesday! And don't forget about our Starburst Quilt Along! It's never to late to join in! Blocks 1-3 are available for free on Craftsy!


Linking up with Fabric Tuesday and WIP Wednesday!

Monday, November 11, 2013

Starburst Quilt Along Week #3 -- Block #3 and Block #2 link up

The Starburst Quilt Along is now over, but the entire pattern is now available for purchase.

Welcome back everyone!

Hopefully your first two blocks have gone well thus far!

This week we are working on Block #3. This week we are doing one of the blocks that isn't symmetrical all the way around. Make sure that the colors from your center paper pieced block match the corner square blocks as you're putting it together.

These are my two blocks:


As with the previous blocks, I used the larger scale prints in the corner squares.

When you finish yours up, share them over in the Flickr group and come back next week to link up your pictures and blog posts for #3!!

Monday, November 4, 2013

Starburst Quilt Along Week #2 -- Block #2 Introduction and Block #1 link-up

The Starburst Quilt Along is now over, but the entire pattern is now available for purchase.

Welcome back to the Starburst quilt along!

This one is also fairly simple. As usual, please make sure that you print it out full scale! See the brief printing directions here if you have an issue.

Here are my two blocks (please disregard the threads all over them, I'm not perfect!):


General Notes:
I picked two of my larger scale prints for the main fabric to show them off a little bit more.

One thing to note is that you can also deviate a little bit from the suggested numbering in many cases. For the center block, as long as you add the center fabric first, you can do the outer triangles in any order. The same thing goes for the outer center pieces.

I used smaller scrappy pieces for piecing the center blocks to save on fabric.

I will fully admit that I accidentally printed this pattern in the wrong size and had to remake the entire second block. I have a block that ended up about 8 3/4 inches instead of 9 1/2. I will probably use it on the back.

Good luck with Block #2! Head on over to the Flickr group to share your progress and ask questions!

Sunday, October 27, 2013

Starburst Quilt Along Week #1 -- Block #1 and fabric requirements

The Starburst Quilt Along is now over, but the entire pattern is now available for purchase.

Welcome to week one of our Starburst Quilt Along!

This pattern can be made into a wall hanging:


Or for as a throw sized quilt:


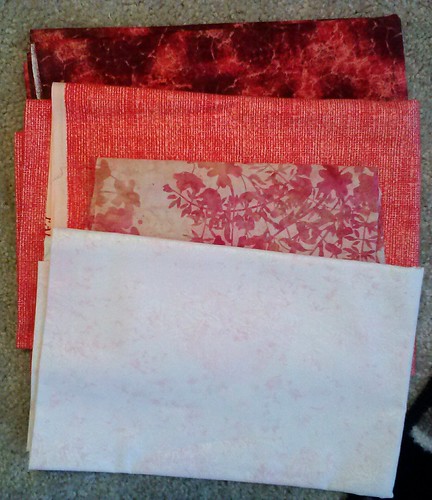
For your foreground fabric (fabric for stars themselves), most of the stars use 4 different fabrics. Amanda's quilt uses 4 different fabrics with very different intensities with a white background. All of the eight star points (that are a part of every block in this series) she used the medium orange fabric for.

Starburst fabrics

My quilt uses 9 different fabrics, some lighter, some darker, but some purple, blue, teal, and green on a black background.


We have a thread over on the Flickr Group for everyone to share their fabric pulls!

IMPORTANT NOTE: When you go to print your blocks, when your print screen comes up, make sure you click "actual size" under the scaling menu instead of "fit to page" -- otherwise your blocks will end up too small!! Double check yourself -- from dashed line to dashed line should measure 3 1/2 inches.


General Tips for Block #1:

Everyone finds their own "groove" when it comes to paper piecing techniques. If you're a newbie, I would suggest starting on the corner blocks first and then doing the center side blocks second.

When prepping your fabric to use for paper piecing it is easiest to cut strips or smaller chunks from your yardage to work with on your blocks. I typically cut 3 3/4 inch or 4 inch strips in this project -- that way if I wanted to cut a 3 1/2 inch square of the foreground fabric for a particular block (which you have in Block #1) you can do so from your pre-cut strips. 

The dashed line on the block template is the cutting line that includes the quarter inch seam allowance for when you sew your blocks together. 

Save your scraps! A few of the blocks later on will be able to use some pretty small pieces! I know that I jigsaw my fabric around so that I waste as little as possible. If you're just starting out, don't risk your fabric being too close to the seams and pulling apart -- no one wants that! Better to trim off the excess than to realize that you have to rip out that piece and start over!

I tore off my paper templates before I put my nine starburst units together. Some people don't do so until the block is finished (to help eliminate stretching along the bias). I find that it adds unnecessary bulk when sewing the rows together.

I sew my blocks together into three rows of three blocks and then sew my three rows together. I press my seams to one side and then alternate which way the seams face (both seams in, both out, both in, etc.) to have interlocking seams when I go to sew the rows together. I typically iron to whatever side is less bulky.

Here are my two finished Starburst #1 blocks:


Please comment here or on the Flickr group if you have any questions or comments! 

Go forth, and paper piece to your heart's content!

Saturday, October 26, 2013

October Stash Bee Blocks

Nothing like getting my blocks done under the wire!


The tutorial is over at the Stash Bee and it comes together VERY quickly!!

Thursday, October 24, 2013

Starburst Quilt Along -- Come join us!!!

The Starburst Quilt Along is now over, but the entire pattern is now available for purchase.

Starting October 28th!!


Together with Honey, Bunny, and Doll patterns, we are offering a FREE paper piecing pattern quilt along!

One star pattern will be released each week here at Little Bunny Quilts on Mondays. On the following Monday, you can link up your finished blocks!

You can make one of two sizes: a wall hanging with one of each of the 9 designs OR a throw size with two of each of the 9 blocks.

We also have a Flickr group to share progress!

Block talks and finished block link up dates
October 28th -- fabric requirements, intro to paper piecing, Block #1
November 4th  -- Block #2
November 11th  -- Block #3
November 18th  -- Block #4
November 25th -- Block #5
December 2nd -- Block #6
December 9th -- Block #7
December 16th -- Block #8
December 23rd -- Block #9
December 29th -- setting options -- final link up for finished blocks is in this post!

For those of you that link up all 9 or 18 finished blocks by January 15th, you will receive the setting directions FOR FREE from HBD Patterns!

Starburst Quilt Along

Tell your quilting friends -- this one's on us and we can't wait to share our patterns with you!


Monday, September 16, 2013