Monday, May 15, 2017

Christine's Kitchen QAL {Week 9}

Welcome back to Week 9 of the Christine's Kitchen QAL! Today we're assembling the center of our quilt top! Hooray!

Update: The QAL Is now over and the entire pattern is now available for purchase.


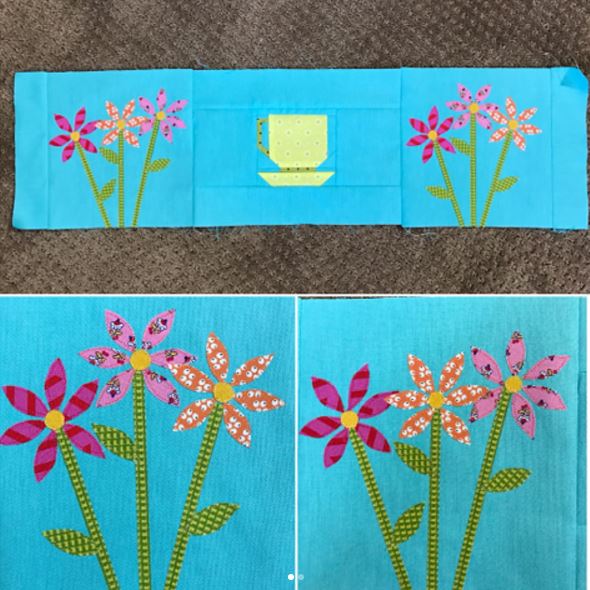
This is a short and simple week -- connect your four rows together and then add sashing to all four sides! The skinny sashing goes on the sides and the wider sashing goes at the top and bottom so that your top will now be ready for the pieced border we will make next week!

Here's my sashed quilt top:


Our winner from last week is Tracy! It seems like quite a few of our "regular participants" didn't post finished blocks from last week yet (frown!) so hopefully this quick week will allow you time to catch up! Here's Tracy's applique blocks!


No giveaways for the next two weeks, but we will have multiple giveaways for those who send in finished quilt pictures for the quilt parade!

Thinking about joining in late? There is still a lot of time to catch up before the final quilt parade in June! 

Sunday, May 14, 2017

Pinwheel Pals {Moda Bake Shop}

Today I'm back at Moda Bake Shop sharing a brand new pattern -- Pinwheel Pals -- which allows you to make two baby quilts out of a single layer cake!

I'm honestly not much of a layer cake person but this pattern is a good way to use one up (or at least most of one!) and stretch the fabric a little bit further. These quilts use Lily and Will Revisited, a new spin on their original Lily and Will fabrics -- both of which I absolutely love because they include bunnies in the fabrics! I mean, my blog is Little Bunny Quilts -- could there be a better fabric match?

I separated out the mainly pink and mainly blue fabrics from one another and then split the grey fabrics between the two quilts. The backing of both quilts is the same grey and white print.


With the quilts being the same pattern, I decided to quilt each one slightly differently. For the pink quilt, the center sashing is squiggles, the pinwheel blocks are loops, the middle border is curls, and the outermost pieced border is loops.


For the blue quilt, the center sashing is loops, the pinwheel blocks have meandering only in the print fabric, the middle border is loops, and the outermost pieced border is squiggles only in the print fabric.


For each quilt I used the plaid fabric in that particular color for the binding. These quilts finish at 48 inches, but you skipped the outermost pieced border, the quilt would be 40 inches square.


For the first time in a long time, I actually don't have a list of babies to make quilts for currently! Hopefully that means I can work on WIPs for a while and use these two quilts for the next boy and next girl that come along.


Hop on over to Moda Bake Shop to check out the full tutorial for this pattern!


Monday, May 8, 2017

Christine's Kitchen QAL {Week 8}

Welcome back to Week 8 of the Christine's Kitchen QAL! Now that we're done paper piecing, we're in the sprint to the finish line to finish the quilts!

Update: The QAL Is now over and the entire pattern is now available for purchase.


It's applique week! We're making two applique blocks to add to Row #2. Here are my applique tips for this week!
  • If you plan to hand applique, don't forget to add your seam allowance to the templates in this week's pattern.
  • I machine appliqued my blocks -- my stems are 1/4 inch strips (see below) and my flowers are pink and purple. 
  • Before machine appliqueing, test your stitch tension. I keep a scrap nearby to test my tension, much like testing tension for machine quilting.
  • Stitch slow and steady until you get the hang of keeping your stitches at/on the edge. I used a zig zag stitch for my stems, leaves, and flower petals.
  • When adding my fusible applique pieces, I added my flower centers first, then my stems and leaves, and finally the flower petals.
  • Don't forget to trace your shapes onto your fusible web before you iron it to your fabric!
Let's take a peak into my machine applique process:

Here are my flower centers and a section of petals traced and ironed onto my fabrics:


For the stems, I ironed a larger piece of fusible web onto my green fabric and then cut 1/4 inch strips from that section.


Here are my applique pieces added step by step:


For my machine applique I used two different variegated threads from Superior threads on the top with off-white in the bottom. Don't forget to trim your blocks to 8 inches!


Here are Amanda's blocks:


Once your blocks are complete, you can add them to either side of Row #2! 


Since we've finished a row this week, we'll be doing another giveaway! This week will be another two pattern giveaway! Don't forget to post your finished rows on Instagram with #ChristinesKitchenQuilt! 

Our winner from last week is Alice! Check out here entire china collection:


Thinking about joining in late? There is still a lot of time to catch up before the final quilt parade in June! Sharing at Let's Bee Social too!

March 20th: Blocks 1 and 2; sashing

March 27th: Blocks 3 and 4; building Row #1
April 3rd: Block 5; sashing
April 10th: Blocks 6 and 7
April 17th: Blocks 8 and 9; building Row #3
April 24th: Blocks 10 and 11; sashing
May 1st: Block 12; sashing, building Row #4
May 8th: Applique blocks, building Row #2 (you are here!)
May 15th: Setting 
May 22nd: Border and finishing
May 29th: Memorial Day break
June 5th: Show off your quilt!

Friday, May 5, 2017

Gathering Mystery {Week 4}

Despite the fact that the Week 7 (!!!) directions come out today, I have only just finished Week 4 which seemed to take forever, mainly owing to the fact that I am a crazy person and decided to make the Queen sized quilt.

For Week 4, our assignment was to make two different square-in-a-square units. I had to make 64 of one of the units and 40 of the other. I spent a lot of evenings pressing and trimming dog ears while I watched baseball. And of course, LOTS of chain piecing.


Another thing that took quite a while was meticulously keeping all of my directional prints in the same direction. While it didn't really matter for my blocks on the left because all of the side triangles are my background fabric, the blocks on the right were a different story.

All of the units have the green zig zag fabric going in the same direction as well as the day lily print going from upper left to lower right. That took a bit of planning and made me glad that I didn't cut my green squares into triangles until I knew what I was doing with them.

Even though this was a little fussy, I am EXTREMELY glad that I swapped the green zig zag and the orange day lily from their original assignments in my fabric pull because these units are definitely better as a result. The orange day lily print would have gotten SO chopped up and wouldn't get to shine like it does in these units.

For Week 5 we are making "half snowball units" -- meaning that we're starting with squares and adding stitch and flip corners to two of the four corners. I have all of my diagonal lines drawn on my squares, but I need to just find the time to do the stitching.

For Week 6, we are making "house units" which is essentially a half square-in-a-square unit. I haven't drawn the lines on these fabrics yet.

And of course Week 7 gets published today!


Want to join in with me? Pop on over to Cora's Quilts to find out more! Don't forget to pop on over to my last post to enter to win some yummy Island Batik fabrics!

Wednesday, May 3, 2017

Batiks Gone Modern {Introduction + Giveaway}

This is the project that I am MOST excited about as an Island Batik Ambassador -- our modern quilt month!


Some people think that modern quilting and batiks don't mix -- those people would be wrong.

To me, modern quilting is dominated more by design aesthetics rather than the type of fabric. Obviously, some fabrics lend themselves more readily to a modern aesthetic than others but let's take a stroll on the wild side and let me convince you that batiks can be totally modern.

1. Any quilt in all solids is easily translated into batik "near-solids" or blenders.
I would consider this as a "jumping off point" for any modern quilter wanting to work with batiks.

2. Batiks and ombre are a match made in quilter's heaven.
Batiks have a built in "blend" within themselves -- making them a perfect choice for an ombre quilt.

3. You can cut batik fabric into the same shapes and sew it together using any modern-styled pattern.
Alternate gridwork? Totally an option. Wonky piecing? Yep, you can do that. Paper piecing? Sure! (I think you get the picture.)


Before you go buy 30 yards of batiks, let's bring you back to earth and note a few caveats and limitations with batiks:

1. More than likely, you're not going to mix prints and batiks.
One exception is using a blender batik as your background, but most of the time you'll lean toward making all batik projects.

2. The larger scale prints might not be as easily used in modern-style pieces.
The high color contrast larger scale prints might not be as easy to use in a modern quilt project as things with blender batiks or smaller scale prints that read as a solid or blender at a distance.

3. Be prepared for the texture difference.
As a whole, I find that batiks can be slightly thinner but also slightly stiffer than a comparable print or solid fabric. (And ps. expect to pay a few dollars more for batiks as your LQS!)


So let's dive into what I'm going to be making this month. For this project I decided to design around the fabric that I had, rather than starting with a basic design. Once you see the fabric you'll understand why:


I saw it and it screamed "Make us into something ombre-gorgeous, Alison!" and I complied.

Ombre on its own certainly isn't modern (look at the traditional bargello quilts from the last 20 years) so I wanted to use a distinctly modern block and/or block arrangement so that if you saw this quilt from 10 yards, you would say, "A modern mini!" and be very excited. Here's my mock-up design:


Yes. Everest made from a mountain of ombre wonky crosses. For some reason Blogger turned the diagram magenta rather than the lovely shades of purple and lavender that I made it in, but I think you get the point. All of my fabric cuts are half yards, so the outermost border will depend on how much I have left of it at the end. My design ends up at approximately 32 inches square.

My goal is to have this mini quilt as a free pattern at the end of the month, but if you want to make along with me, I'll be putting the directions up here on the blog as I go along. This doesn't have any sort of set schedule since I'm already hosting one quilt along, but expect 2-4 more posts about this project with lots of pictures and details.

What would you have made with this bundle? Tell me and you'll be entered to win some Island Batik fabric in your choice of colors!

Sharing at Let's Bee Social!