Pages

Thursday, February 28, 2019

Blooming Bear Tracks {Home Grown Hop with Benartex}

Today I'm excited to wrap up the month of February by showing off some secret sewing that I have been working on all month!

Welcome to my stop on the Home Grown Hop!


There are certain designers that I *always* jump at the chance to play with their lovely fabrics -- and Nancy Halvorsen is one of them! Before I was deep into quilting myself, my mom was already a quilter and one of her favorite designers has long been Nancy Halvorsen and passed on her love to me!

This fabric line is fun and cheery and includes some great basics that I would tend to hoard in yards if I had more space!


Since I already needed to make a baby quilt for a friend, I decided to use some of the fat quarters of Home Grown to make a "blooming" version of our Bear Tracks pattern. I used both large floral prints, reds, pinks, and greys for my quilt top.

I had to make a lot of half-square triangles! I used three main pairs of fabrics to make my blocks.


One bear paw down, over a dozen to go!


I used the floral prints mainly for the large spacer squares that are in between the blocks. They are almost too pretty to cut up!


With only 25 blocks, this quilt top zipped together quickly!


I decided to skip the border on this and to quilt the quilt at this size. I used a slightly abstract floral motif for the free motion quilting and used a medium grey Aurifil thread for the quilting.


I used a piece of flannel for the backing and I used a half-yard from my stash to make bias binding.


I top stitched the binding and now this quilt is ready for some baby snuggles!


Quilt Stats:
Name: Blooming Bear Tracks
Pattern: Bear Tracks by HBD
Fabrics: Home Grown by Nancy Halvorsen
Quilting: Abstract floral in grey Aurifil
Size: 40" square
Started: February 2019
Finished: February 2019
Future: Baby quilt for a friend

Now it's your chance to win some fat quarters of Home Grown for yourself! Leave comments to enter and up to two comments per person!

1. Leave one comment and tell me which of the Home Grown Prints is your favorite. I love the navy background floral. Click here to see the entire Home Grown collection. 

2. Leave one comment if you follow me in some form or fashion -- if you follow my blog, Instagram, Facebook.

Update: the giveaway is now closed --OhioLori is our winner!


Make sure to check out all of the other bloggers on the Home Grown Hop!

Monday
Introducing Home Grown @ Sew in Love with Fabric

Tuesday

Debby @ Debby Kratovil Quilts
Kelly @ My Quilt Infatuation


Wednesday
Carol @ Just Let Me Quilt
Nancy @Masterpiece Quilting


Thursday
Jennie @ Clover and Violet
Alison @ Little Bunny Quilts


Friday
Nancy's Virtual Trunk Show @ Sew in Love with Fabric

Monday, February 25, 2019

Stitched with Love {Now Available!}

And you thought that there was only the Stars at Play pattern coming out!

This pattern is one written by my wonderful mom for 2.5" strips and scraps. Her original quilt features a Valentine's Day line which inspired the name for this pattern -- Stitched with Love!


This is a pattern that's perfect for beginners -- just rectangles and squares! It works well with 2.5" strips and other precuts too.

The quilt is also a great throw size. I'll be using this pattern for an upcoming Island Batik ambassador project!

Stitched with Love on Etsy
Stitched with Love on PayHip

Friday, February 22, 2019

Stars at Play {Finished Mini Quilt}

My latest mini quilt is complete! Making mini quilts was our "assignment" as Island Batik Ambassadors this month -- a fun and quick project was just the thing for me this month!


These fabrics all came in my latest Island Batik Ambassador goody box and I based my fabric pull around the mottled "peacock" accent fabric. As an Island Batik Ambassador, I am provided with samples of various lines of Island Batik fabrics to use and share with you! 


I decided to use our "in the pipeline" pattern Stars At Play in the mini quilt size for this project. I used this pattern last year to make a baby quilt! This mini is just a scaled down version of that quilt -- using 6" blocks instead of 9" blocks.


For the backing, I used a large cut of black solid batik (yes, this is a thing!) and layered it and the top with some pieced-together batting scraps. I decided on using the teal Auriful thread for the quilting but decided to use grey in the bobbin. Since the threads were just different colors of the same weight thread, I didn't run into any tension issues, which made the quilting process quick and easy!

I used a swirl-and-loop motif that I have used a few times before -- just in a smaller scale for the mini quilt.


For the binding, I used a grassy green batik. Instead of simple topstitching, I decided to go fancy and use a decorative stitch for sewing the binding to the front of the quilt. I used a leaf-shaped satin stitch (#25 on my Magnolia) in a chartreuse green Aurifil thread.


Now this quilt is ready to hang in my sewing room! 


Quilt Stats:
Name: Stars at Play Mini
Pattern: Stars at Play
Size: 24" square
Fabrics: Various Island Batik fabrics -- a half yard of the main peacock print; 5" strips of other fabrics
Quilting: curls and loops
Started: February 2019
Finished: February 2019

Sharing at Brag about your Beauties and Linky Tuesday!

Thursday, February 21, 2019

Stars at Play {Now available!}

I'm really excited today because a long-time coming pattern is now available in our Etsy and PayHip shops! Our Stars at Play pattern is now available!

This pattern was originally designed by Amanda when she had some beautiful jellyfish fabric she wanted to show off in larger squares. She used solids to make the coordinating Missouri Star blocks.


She even cut the accent fabric pieces so that all of the jellyfish are floating in the same direction! Her original mini is 24" square.

I used her original design and scaled it up to a 36" baby quilt last year for one of my Island Batik Ambassador projects. Check out this finished quilt here!


This year, I made my own version of the 24" mini quilt using blues, greens, and purples. I wrote a separate post about my finished mini quilt version!


The pattern also includes a 48" square version for those of you that like a bigger baby quilt or smaller sized throw. This fun pattern is perfect for showing off a favorite fabric! If you make your own version of this pattern, use the hashtag #StarsAtPlay and #HBDquilts on Instagram!

Stars at Play on Etsy
Stars at Play on PayHip

Monday, February 18, 2019

Daisy Chain QAL {Cutting}

Update 8/11/2020 -- This pattern is now available in our Etsy and Payhip shops. Please visit one of those sites to purchase the full pattern.

Are your rotary blades sharp and rulers at the ready? It's time to do the cutting for our Daisy Chain quilts!


If you're still working on picking out your fabrics, that's okay! Take a peak at our earlier post on picking colors for your quilt

Update: The cutting directions are now only available in the for purchase pattern.

***For your scrappy fabrics, if you are working from yardage or scraps, you do not need to pre-cut your focal fabric into strips unless you feel so inclined. You may want to wait and cut these strips as we go along so that you can choose the colors for each step. There are extra strips included in the given number of required focal fabric strips -- this is to give you a little wiggle room in the event of miscuts.

There's really not too much to add about cutting -- remember that cutting your units from largest units to smallest units usually is the most efficient way to cut your fabric and that's the way the units are listed in the cutting charts.

For my baby sized quilt, I cut some of my fabrics into strips -- the fabrics I definitely want to use in the quilt -- but didn't cut everything. The brown on the furthest right is my accent fabric.


For the second quilt, since I'm using a strip pack for my assorted/scrappy fabrics, I only needed to cut the background, focal, and accent fabrics.


Check out the posts from my blogger friends:
--Stephanie's Halloween theme is going to be adorable!
--Kate's quilt has a regal feel!
--Christina has bold flowers for her focal fabric and her background will be scrappy!
--Gail has a blue, red, and cream color scheme.
--Michelle also has aqua for her focal fabric!
--What do you think of Gene's orange background fabric?

Schedule
Cutting - February 18th <--- That's today!
Top Construction Part 2, Layout - May 20th
Link up/giveaways/quilt parade starts: June 3rd
Link up/giveaways/quilt parade ends: June 17th

Friday, February 15, 2019

Stars at Play Mini {Under Construction}

Now that I finished my Good Fortune quilt top, it's back to focusing on things with deadlines -- but that doesn't mean that those projects aren't fun!

While working on finishing up the last of the unit construction for Good Fortune, I was also working on the unit and block construction for my Island Batik Ambassador mini quilt project for February.


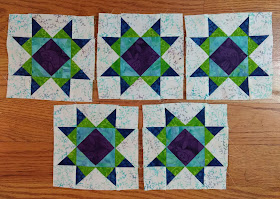
Last week, I had quite a few pieces and parts made for the Missouri Star block portion of the mini quilt. The pattern calls for five star blocks and I am very happy with the final color selections I made for the blocks.


Isn't that background fabric gorgeous? It pulls in all of the colors from the block.

Next up was making the snowball blocks -- these four blocks with the five star blocks make up the center of the quilt.


These rectangles are used in the pieced border.


Now the top of this mini quilt is complete and ready for quilting!


What color(s) do you think that I should use for quilting? I've pulled four different colors of Aurifil from my stash.


I'm leaning towards the purple or the aqua -- what do you think?

Sharing at Linky Tuesday!

Wednesday, February 13, 2019

Good Fortune {Finished Quilt Top}

After having to make a bunch more units for my borders (which was a long detour!) I have finished my Good Fortune quilt top!

The first task was finishing up the extra green HSTs for my green HST border. I also cut the necessary extra units for my QST units at the same time.


It was nice to already be mostly done with this border and only have to worry about adding on the last side!


I decided to skip the neutral border from the original quilt and just add the QST border directly to the HST border as it was *exactly* the right size for an even number of units. I also probably don't have enough background fabric to add a spacer border of any size anyways -- I only started with 2 yards of the dot print as my background, didn't feel like ordering more, and I like the look of the two different pieced borders next to one another.


Now this top is finished! My changes from Bonnie's original are as follows:
--substitute aqua instead of orange
--half as many total blocks in the center
--spacer border before HST border
--skipped neutral pieced border between HST border and QST border

I'm not sure how and when this one will be quilted -- having On Ringo Lake pantograph quilted was definitely the right decision for that quilt, but I am going back and forth about what to do with this one. It's certainly a manageable size for me to quilt since it's a small throw, but since it isn't a project with a deadline, it will likely be shelved for a while.

But I do know one thing -- this quilt needs a red binding once it is quilted!

Have a Happy Wednesday and Happy Valentine's Day!

Sharing at Needle and Thread Thursday!

Monday, February 11, 2019

Coast to Coast Bee 3.0 {My Block}

A new year means the start of new quilt bees, including the Coast to Coast Traveling Bee! While we decided to put off the start of this year's edition of the C2C Bee until February, I have been looking forward to this bee restarting since we concluded last year!

As a reminder, here are my two quilt tops (neither are finished quilts yet, oops.) from 2017 and 2018:


This year, I took my starting block inspiration from my new hometown -- Gettysburg, PA! I found this quilt block that's actually called "Gettysburg" and scaled it to an 18" finished block.

For my fabrics, I pulled Kona Navy for my background and red, white, and aqua fabrics for the rest of the piecing. I decided to paper piece my square in a square units.


The best part about big blocks is how fast they are!


Instead of using this block as the start to a medallion, I'm going to ask each of my bee-mates to make their own 18" finished block inspired by a location -- with lots of state-inspired and history-inspired quilt blocks available, I hope this is a fun (and not overly difficult) request!

Here's a mock up of my design idea with my block repeated four times (but each person will choose their own block(s)!


My plan is that each block will have the Kona Navy background and I will also use the same fabric for the sashing. This will end up being more in the range of 40-45" square rather than a bigger throw quilt. This quilt is likely going to end up in our red bedroom (aka the baseball room) as a quilt for whichever chair ends up in that room as the "reading chair".

I will be working on Stephanie's quilt first this time around. Sharing at Linky Tuesday!

Friday, February 8, 2019

Stars at Play Mini {Magnificent Minis with Island Batik}

This month, our Island Batik Ambassador theme is mini quilts! 


As an Island Batik Ambassador, I am provided with samples of various lines of Island Batik fabrics to use and share with you! 

We were tasked with making mini quilts less than 24" square, and I knew just what I wanted to make! 

You might remember my Stars at Play quilt that I made last summer as an IB Ambassador project. 


Amanda and I have been working on getting this pattern finished and I decided to make my own version of the mini quilt for this pattern using my new IB fabrics.

Here are the fabrics that I pulled initially for this project:


The "peacock" fabric on the bottom (yes, that's its actual catalog name!) is my main fabric for this mini quilt and the cream print will be the "background" fabric. The rest of the assorted fabrics will be used to construct my Missouri Star blocks. I pulled out the lime green and don't plan to use it at all; I pulled out the green on the left side to use as the binding.

Here are my fabrics all cut:


I've started working on the block units for the Missouri Star blocks -- these are much smaller than my first go-round with this pattern!

Square in a square units:


Half square triangles prior to trimming: 


Hopefully next week I will have some finished blocks to show you! Don't forget to enter to win some Island Batik fabrics for yourself in my post from Wednesday!