Pages

Wednesday, July 31, 2019

Happy Mail {Island Batik Ambassador Box #2}

Twice a year it's like Christmas for Island Batik Ambassadors!


I shared my unboxing video a few days ago on our Facebook page, but here it is for those of you who may have missed it:


Here are some photos as well:

First up, my strip pack of Sand Bar, coordinating two yard cuts, and coordinating half yard cuts. These are the fabrics that I am going to be using in my August project. I'm going to be making the wall hanging size version of our Starburst pattern.


Next, a 10" stacker of Quiet Shades, coordinating two yard cuts, and coordinating half yard cuts. These beautiful pastels will be used for my September baby quilt project.


I also received a fat quarter bundle of the Primo line. I absolutely love all of the different geometric prints in jewel colors.


Basics are also always good to have on hand -- four yard cuts of neutral batik and solid black, white, and grey!


Two spools of Aurifil as well as a brand new "block on board" die from Accuquilt also were tucked in this box:


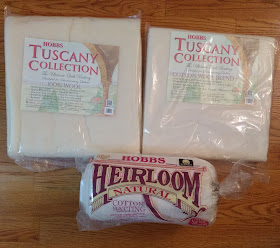
Finally, three lovely battings came from Hobbs, one queen sized cotton, one throw cotton-wool blend, and one throw wool.


Now, the best part: I have cleaned some of my fabrics from my previous boxes to share with you!

I have a fabric bundle to give away to a lucky winner!


This bundle is all of the scraps, remains, and remnants of the Flea Market fabric that I used to make my Daisy Chain quilt.

Leave comments to enter, if for some reason you cannot leave a comment please email me (littlebunnyquilts@gmail.com), up to two entries per person:

1. Leave me a comment telling which of my 2019 Island Batik Ambassador projects is your favorite so far:
2. If you follow me in some form or fashion, tell me how you follow.

Good luck!

Update: our winner is Kathryn!


Ps. I'm linking my giveaway to Laura's new Giveaway Party linky! Check out the great giveaways already listed on the linky!

Monday, July 29, 2019

April Showers {Finished C2C Quilt}

After getting this back two years ago, it sitting on a shelf (and then getting moved!) for 18 months, finally getting the final border added, and sending it off for quilting, my first Coast to Coast Traveling quilt is finally, finally finished!


This was the first quilt that I sent out and received back in our Coast to Coast Traveling Bee group (C2C). I originally made the lone star center and scrappy first border, and then my group members made all of the subsequent borders of this medallion-style quilt, and I finally added the last border this winter after our move.


While in my dreams I would have loved to custom quilt this baby from the center out with fancy flourishes and creative curls, I knew that with as many quilts as I have waiting to be quilted and with the size of this quilt, it would be a better choice to be sent off to the long arm quilter.


The quilting motif is a rose motif that I've had done on a number of different quilts. The backing is an extra wide teal dot print. For the binding, I was set on using red originally, but I found this super cute pear print from the Vintage Picnic line on sale at the quilt shop this weekend and thought it was just darling.


It is so wonderful to have this quilt finished -- it's been laid upon the guest room bed (seen below) and is a great accent for the very red room!


Quilt stats:
Name: April Showers Medallion
Pattern: None, blocks chosen by members of my bee and added in the medallion style
Fabrics: A layer cake of Bonnie and Camille's April Showers line; grey and white solids; additional fabrics added in by my bee mates in coordinating fabrics
Quilting: Pantograph roses
Size: approximately 85" square
Started: January 2017
Finished: July 2019
Future: Bed quilt to keep for myself

Sharing at What I Made MondayLet's Bee Social, and Needle and Thread Thursday! And Brag About Your Beauties, too!

Friday, July 26, 2019

Double Delight {Finished Quilt}

Finishes make me so happy!


I started this quilt last year after I finished my On Ringo Lake quilt top and wanted a new scrap project. This is another Bonnie Hunter quilt pattern, it is available on her site for free currently, and was a mystery quilt of hers a long while ago. 

I swapped some of the colors in my quilt (burgundy instead of red/brown, chartreuse instead of goldenrod) but for the most part my quilt is pretty similar to the original. I modified my borders slightly so that my top and bottom borders were wider than the side borders so that my quilt top was twin sized instead of full sized.


This quilt was also sent off to the long arm quilter. This has a very simple loop de loop quilting motif.


For the backing, I picked out a navy viney extra wide backing. I also used this fabric for the binding. I was lucky enough to find a brand new spool of navy Aurifil 50 wt. thread to use for the machine binding too!

Now this quilt is finished ready to adorn the futon in my sewing room!


Quilt stats:
Name: Double Delight
Pattern: Double Delight by Bonnie Hunter with modified borders
Fabrics: Scraps, scraps, and more scraps
Quilting: Pantograph loop de loops
Techniques used: strip piecing, blocks set on point
Size: approximately 70" x 88"
Started: March 2018
Finished: July 2019
Future: Twin sized guest quilt

Sharing at Brag about your Beauties and Oh Scrap! This is also my July Favorite Finish!

Wednesday, July 24, 2019

Good Fortune {Finished Quilt}

I am so happy that my version of Bonnie Hunter's Good Fortune mystery quilt is now finished!


I made a scaled down version of last year's mystery quilt -- I made half as many blocks for the center of the quilt -- and then adjusted my borders slightly to fit the size of my quilt.


My mom quilted this for me on her mid-arm. She used a chrysanthemum motif for the quilting.


The backing is a red extra wide backing, I also used this fabric for the binding. I decided to hand stitch the binding on this quilt; I typically prefer to hand finish the binding on pieced borders.

My quilt is a small throw, and will likely spend most of its life in our guest room. 


Quilt stats:
Name: Good Fortune
Pattern: Good Fortune by Bonnie Hunter, modified to a throw size
Fabrics: Scraps
Quilting: Chrysanthemums, quilted by my mom
Techniques used: string piecing, stitch and flip corners, pieced borders
Size: approximately 54" square
Started: November 2018
Finished: July 2019
Future: Guest room throw

Sharing at Let's Bee Social and Needle and Thread Thursday!

Monday, July 22, 2019

Too Hot To Trot {Literally}

Depending on where in the world you live, you might have spent your weekend similar to me: being outside as little as possible and avoiding the awful, oppressive heat and counting down the hours until the cool front moved in.

Saturday I had to make a quick trip down to the quilt shop to drop off quilts for their gallery! We are just so excited that Capital Quilts is carrying some of our favorite HBD patterns and that I am teaching a class there in just two weeks! If you are semi-local, consider coming out for a class on our Ready, Set, Soar Pattern!

While I was there, I picked up a couple cuts of fabric. The top fabric, from Vintage Picnic, will be the binding for my April Showers bee quilt. The other two fabrics were picked from clearance for general stash additions.


I spent the rest of the day working on the bindings of the three quilts that my mom brought back to me from the quilter -- two went to the long armer and one quilt she quilted. One by one, I trimmed each quilt and added the bindings to my Double Delight. Good Fortune, and April Showers quilts.


This was the pile of aftermath on my kitchen table from trimming three quilts. While I bought the navy pear fabric for the April Showers quilts, I used the backing for the binding for both Double Delight (the navy fabric peaking out) and Good Fortune (the red fabric). I hand bound Good Fortune, but the other two quilts were bound completely by machine.


(A quick aside: would you find it helpful for me to write a tutorial about using the backing for binding? Talking about trimming your quilt after quilting to maximize usable fabric? Tell me in the comments!)

So spoiler alert: I have three (t-h-r-e-e!) finished quilts that I will be showing off over the next two weeks! But none today, because the heat was just too much to try to take pictures of them outside.

I had also not yet put away my Jingle Bell Square fabrics, so I decided that I would make whatever units I could make -- not necessarily worrying about making full blocks -- and set them aside for the next time I pull out this project. In sorting my scraps, I found some larger pieces that allowed me to squeeze out *five* more blocks for this project!


Now I have 14 red blocks and 12 green blocks -- a total of 26 out of the 49 that I need to make -- now I have officially crossed the 50% mark!

I have also been keeping up with making my border QSTs and did end up with a few extra block parts:


But, ideally, the rest of this week's blog posts will be dedicated to finishes! It will be so nice to have fewer WIPs on my list -- and we'll see how long I can resist starting a new project!

Sharing at What I Made Monday and Wednesday Wait Loss!

Friday, July 19, 2019

A Little Jingle-Jangling {Scrappy Sewing}

Back in April, I had gotten to a stopping point with my scrappy Jingle Bell Square blocks since I had exhausted my stash of neutral fabrics. Since then, I made and completed my Christmas Churns quilt for Moda Bake Shop using the Little Tree line -- now I have new piles of scraps to work with for this project.

I made a batch of five blocks that used the Little Tree fabrics exclusively, with the exception of the black and cream dot fabric in the bottom row of blocks.


Before I started working on these blocks again this week, I took some time to sort out some of the parts I had already prepared -- some squares and strips cut in the correct sizes as well as some sets of corner QSTs. I also pulled out some of the fabric scraps that are just too small for this project; despite my efforts, the Christmas scraps continue to languish!

The next set of blocks I worked on have a mixture of the newer Little Tree fabrics and my older Christmas scraps.


That brings me to a total of 21 blocks, and now I have just over 40% of my blocks done.

Sharing at Oh Scrap!

Wednesday, July 17, 2019

Tree Mini Quilt {Artsy Fartsy Finish}

My "artsy fartsy" project for this month is finished!


Here are the previous posts about this project:
Project Beginnings
Machine Applique
Quilting in Progress

Stepping back, I used a light aqua 50 wt. Aurifil to quilt loops in the sky area. I then trimmed the mini quilt into a rectangle.


I used a navy batik for the binding; I used a blue 28 wt Aurifil thread to do the final top stitching. I had never used the 28 wt. before and I really liked it for the binding -- it has more weight than the 40 or 50 wt. threads, but is not as thick as the 12 wt.


Now my tree mini quilt is finished!


As an Island Batik Ambassador, I am provided with samples of various lines of Island Batik fabrics and Aurifil threads to use and share with you!

Our challenge for this month was to make an art-style quilt with at least three different weights of Aurifil thread, and I think I succeeded at that task! I used four different colors of 50 wt. threads for the top stitching and FMQ. I used 12 wt. thread for the heart and 28 wt. thread for the binding.


Quilt stats:
Name: Tree Mini Quilt
Pattern: self-designed
Fabrics: Various Island Batik half yard cuts and scraps
Batting: scraps
Quilting: various FMQ designs using 50 wt Aurifil thread
Techniques used: FMQ, machine applique, topstitching with various stitches
Size: Approximately 25" x 12"
Started and Finished: July 2019

Sharing at Brag about your Beauties!

Friday, July 12, 2019

Quilting in Progress {Artsy Fartsy}

I need to come up with a better name for this project than "The July Island Batik Ambassador project using Aurifil thread to make a tree with traces of my and my husband's hands." Suggestions?


This project, whatever I might decide to call it, is now in the quilting stage. As an Island Batik Ambassador, I am provided with samples of various lines of Island Batik fabrics and Aurifil threads to use and share with you!

I used an emerald green 50 wt. thread to quilt swirls and echos in the leaves; I used the same emerald green thread to quilt scallops in the grass. I used the same tan-gold thread that I used to do the blanket stitching on my tree trunk to quilt squiggles on the tree trunk.


Here's the back of the piece, taken at the same time I took the above photo. I picked a darker teal fabric for the backing and for all of the quilting that I have done so far, I used the same color in the bobbin as in the spool.


Next up will be quilting the sky areas, trimming it, and binding it.

Wednesday, July 10, 2019

Branches and Leaves {Artsy Fartsy}

Did you manage to figure out what I'm making for my Aurifil and Island Batik challenge project this month?


Which of the five backgrounds do you think I picked? What do you think I'm making?


If you guessed the top aqua and using the hands to make the trunk of a tree -- you were right!


This project is going to be all machine applique and almost no piecing! To stitch the edges of the tree, I used a gold-tan 50 wt. Aurifil thread and a blanket stitch.


I was initially hesitant about the light thread on the dark brown fabric, but I think it actually works really well.


Next I added a piece of green for grass, using an olive green 50 wt. Aurifil thread for this stitching, but used a different stitch, a cross-hatch like stitch, to sort of give the impression of blades of grass.


I used the same thread for top stitching all of my leaves -- I used two different green fabrics for the leaves and used a blanket stitch for the leaves.


Next came switching over to the 12 wt. peach thread to create a heart on my tree trunk! Having used the 12 wt. thread a few times previously, I have found that I like to use a lighter weight thread in the bobbin and stitch slightly slower than my normal cheetah speed.


Here's my mini quilt top, ready to be quilted!


I have used two different thread weights so far -- 12 wt. and 50 wt. -- and I have a few other 50 wt. threads set aside for quilting as well. I'm not 100% settled on what other thread weight I will add into this project, but I have some ideas!

My very cheesy, slightly arty quilt is turning out pretty cute and I'm very pleased with it! It might not truly fit the "art quilt" moniker, but it's about as artsy fartsy as I'm going to get!