Pages

Wednesday, March 26, 2014

WIP Wednesday: Rows on Rows

After a busy weekend, I'm back to working on my Firewheel 2014 Stash Bee Quilt.

Getting the blocks together into rows with the black sashing went together very fast!


I cut my yellow cornerstones and sewed them to the sashing strips for the horizontal sashing rows. So much chain piecing!


Here's the beaut all together (of course, it was dark by this point and picture taking options were poor!) I am really loving all of the different backgrounds and shades of yellow and grey that everyone used in their blocks. Surprisingly, I only had a little bit of easing to do when I was sewing my blocks together -- which is a miracle when 11 different people made these blocks and now much I had to do on my other Stash Bee Quilt.


Right now, this quilt is approximately 70 by 85. I don't think I'll be making it any bigger!


Sharing at WIP Wednesday at Freshly Pieced!

Monday, March 24, 2014

QCQAL Block #2: Bear Paw

It's time for block #2 in the QCQAL -- Bear Paw!


The traditional version of this block looks very similar to the Sister's Choice block we made last week, so we'll be making a more modern version of the block without the sashing between the paws.

These directions go along with a block made with each bear paw in a different color.

Cutting:

Background:
Four 2.5" squares
Eight 3" squares for HSTs

For paws:
Four 4.5" squares -- one for each bear paw
Eight 3" squares for HSTs -- two squares needed for each bear paw


Sewing:

Draw diagonals along each 3" background square. Match each background square with one colored square and sew 1/4 inch away from the line on each side. Cut apart on the diagonal line, iron HST units, and trim to 2.5" squares. You should now have 16 HSTs -- four (4) of each color


Sew together your HSTs into pairs for the bear paw's "claws" such that each pair of sewn together HSTs's diagonal slants the opposite way.


Sew one of your HST units to your 2.5" background square and sew the other HST unit to the 4.5" bear paw square. Sew together into one bear paw unit.


Lay out your four bear paw units as desired and sew together. Block should now measure 12.5 inches square.

Saturday, March 22, 2014

Triangle Quilt Along -- Fabric Choices

I've decided that I'm going to take the plunge and make a triangle quilt with The Sassy Quilter's Triangle Quilt Along!

The Sassy Quilter

My fabrics are half-yards from Kitty Yoshida's Prospect Park Line. I actually had already decided that I wanted to make a triangle quilt with these fabrics and had set them aside for this project and now I get to be inspired by lots of others as well!


Check out what everyone else has pulled from their stashes for this project here!


Wednesday, March 19, 2014

WIP Wednesday: On My Floor

Since my husband is out of town until tonight, that means I have been making full use of monopolizing the living room with my quilt block explosion.

I had to make two more blocks to get to a total of 20 Firewheel blocks for my 2014 Stash Bee quilt. Here are all of the blocks laid out:


If you follow me on Instagram, you got a preview of the fabric that I'm using for my sashing a week or two ago. It's a Riley Blake Chrimp Squiggle. 


Here's all of my sashings cut 16.5 inches long and 2 inches wide. I have a yellow and grey floral print that I'll be using for my cornerstones, but those aren't cut just yet!


Linking up with the cool kids at Freshly Pieced!

Tuesday, March 18, 2014

Whirlwind Quilt

Somehow between finishing the Double Hourglass quilt and now, I made another entire twin sized quilt.

Seriously.


Because it went so fast, I didn't even take any in progress pictures. What a terrible blogger I am!

The blocks are made from 6 jelly roll strips sewn together and then the strip sets were cross cut into 12.5 inch squares. 48 jelly roll strips end up making 24 blocks!


The inner border is 3 inches finished and the outer border is 4.5 inches finished.

The quilting is based on a pattern that I saw someone use that I can't remember now, but it is similar to this pattern.


The machine quilting went really fast! I am getting much better at controlling the scale of my machine quilting.


I used the backing fabric to bind the quilt -- it is a very cute print of pink flowers on a turquoise fabric!

Stats:
Size: 66 by 88 inches
Pattern: 6 strip Rail Fence + borders
Quilting: Chrysanthemum Scallop
Binding: Machine bound with same fabric as backing.

Sharing at Linky Tuesday and Fabric Tuesday!

Friday, March 14, 2014

Finished Double Hourglass Quilt

Hooray, it is finished!


This quilting turned out great and went together so fast!

The zig-zag fabric ended up being amazing for the binding.  This picture shows a close up of the little flowers in the center of the blocks. I thought the brown stitching might be too much, but it turned out to be a great change from white thread.


And no rumples or ripples to speak of! Hooray!


This one is all ready to be raffled off to support literacy!


I"ll be linking up with ALYoF March Finishes party when it opens up! I'm SO happy to have gotten this goal done early!

Don't forget to check out the Quilter's Choice QAL!

Stats:
Size: 66 by 88 inches
Quilting: FMQ straight lines with four leaf flowers
Fabric: Mostly from Joann -- it's been in my stash for-ev-errrrr!

Wednesday, March 12, 2014

WIP Wednesday: Some Quick Quilting

When I was doing my normal "what am I going to post about this week" I was planning that my WIP Wednesday post would be some in-progress shots of the quilting on my Double Hourglass Quilt.

Wrong. And not in the way that you might think -- I managed to get the quilting on this baby done in less than one day! It still needs to be bound -- machine bound, most definitely -- but I'm still kind of in shock that it is done -- and that I only used 3 bobbins to do the whole thing!


I apologize for the indoor-with-flash-because-its-dark pictures. The sun isn't going to come out today either, boo!

My quilting motif was to FMQ straight lines lined up with the centers of the blocks (through the X of the block) and when I got to the center of each block I made a little four petaled flower in the inner 4 triangles. I used the triangles to help "size" my loops but not all of them are perfectly straight or perfectly sized -- they did get much better as I went along! I then went back and made straight lines perpendicularly through the blocks. I did these lines with my free motion foot as well. 


Here's the zig-zag back! I didn't match up the zig-zags (oh, the horror!) because this one is getting donated to raffle it off I can live with that.


Here's a close up of the quilting on the back:


Now to get started on that binding!

Linking up with WIP Wednesday at Freshly Pieced! Don't forget to check out the first block in the Quilter's Choice Quilt along and to vote for your choice for Block #2!

Monday, March 10, 2014

QCQAL Block #1: Sister's Choice

Today's the day! Our first block in the QCQAL is Sister's Choice!


There are a lot of great examples of Sister's Choice blocks on Pinterest and a variety of ways that you can "color" this block. To me, the more fabrics you integrate, the more modern looking it can become.

The traditional block translates well into 5, 10, 15, etc. inch finished blocks. It doesn't translate into a 12 inch finished block simply. I decided to make the width of the middle fifth of the pattern a half inch smaller for our pattern to make for an easy 12 inch finished block. It's a slight modification from the traditional block's 9 patch made entirely of squares, but I can live with that if you can.

The first thing to do is figure out how many colors you want to use and where you want to use those colors. The above diagrams show 2 color, 3 color, and 5 color versions of the block. The cutting directions go along with the 5 color block I made to explain where each piece of fabric ends up in the finished block.

Cutting:

4 background squares at 3 1/2 inches (HST units)
4 squares at 3 1/2 inches (HST units)
4 background squares at 3 inches (corner squares)
4 rectangles at 3 x 2 1/2 inches (outer rectangles)
4 rectangles at 3 x 2 1/2 inches (inner rectangles)
4 squares at 3 inches (inner squares)
1 square at 2.5 inches (center square)


Sewing:

Draw a line down the center of each one of your 3 1/2 inch background squares. Pair each background square with a 3 1/2 inch focus fabric square right sides together and sew 1/4 of an inch away from your marked line on each side. Cut apart along your drawn line and iron. Trim to 3 inches square. Yield: eight 3 inch square HSTs.


Make four units as shown below. Each unit is made of one background 3 inch square, one focus 3 inch square, and two 3 inch HST units.


Sew each one of your 3 x 2 1/2 inch rectangles of one color to a 3 x 2 1/2 inch rectangle of the other color (ie, sew your "green" rectangles to your "orange" rectangles) ALONG THE SHORT SIDE. Your finished units should measure 5 1/2 inches long and 2 1/2 inches wide.


Lay out all of your units as shown below and sew together. The block should now measure 12.5 inches square, trim if necessary.


Seeing one block makes me very excited to make more! Since I have fat eighths instead of fat quarters, I have to make sure that I rotate through my fabrics and use all of them -- hence why I used five different fabrics in my block.

Here's Amanda's block:


Her fabrics are from the Chiffon line from Free Spirit with some fabrics from her stash mixed in. She used four different fabrics and cut the inner rectangles out of her background fabric instead of a focus fabric. It lightens up the block a little bit and is a great use of negative space.

Saturday, March 8, 2014

March Stash Bee Blocks

This month our Queen Bee is Michelle from Factotum of Arts and she requested that we make stained glass like blocks with white sashing that she's going to put together in a pretty awesome quilt!


I always struggle with making "improv" modern style blocks. It's just not my forte, but Michelle's tutorial in the link above made it so much easier for my orderly brain to follow. 

I made one block in greens and one block with a mixture of red, yellow, and orange.


Hooray for bee blocks that make a dent (even if it's tiny!) in my scrap boxes!

Friday, March 7, 2014

March Sew Kitchsy Block

This month's Sew Kitschy block from Quiet Play is a mixing bowl  and wooden spoon. Since I had already used a blue background for January, and a red background for February, I decided to use yellow for March!


Doesn't that blue on white print remind you of vintage Pyrex?!?! I had forgotten I had a half yard of this fabric in my stash and was delighted to rediscover it because it was perfect for this block!

Sharing over at Quiet Play in the March Block Link-up and the Paper Piecing Friday link-up!

Tuesday, March 4, 2014

March ALYoF Goal: Double Hourglass Quilt

My March ALYoF goal is to quilt and finish the twin sized double hourglass quilt that I will be donating to raffle off to raise money for literacy via Read Lead Achieve!

Right now all of the blocks of the quilt are together and waiting for me to add the border and quilt it.


The orange floral fabric is for the borders (and maybe the binding too) and the zig zag stripe is for the backing. Woo hoo for buying 5 yards of fabric at a time. I plan to quilt it with brown thread and some sort of simple curvy motif. Haven't yet decided what I'll do, but nothing too dense!


Linking up at this month's ALYoF party and WIP Wednesday!

Don't forget to enter our QCQAL kick off giveaway!

Monday, March 3, 2014

QCQAL Kick Off Giveaway!

Are you ready for the QCQAL to start?? We are!

The first poll is now closed -- one week from today we'll post the tutorial for the block you voted for and post the new poll for Block #2! Also watch out for a link-up post for your finished blocks -- you can always post them in the Quilting with Honey, Bunny, and Doll Flickr group!

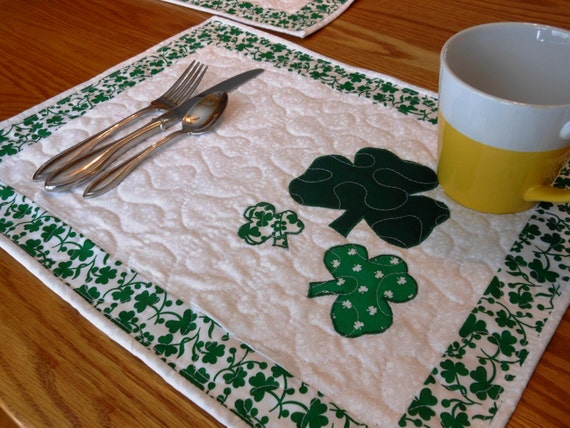
To get everyone even more excited for the QCQAL, we're doing a giveaway of Honey, Bunny, and Doll's Seasonal Placemats Pattern Set #2 -- which includes patterns for shamrocks, flowers, and candy corn!


Here's how to enter to win:
1. For everybody: Add a comment with a block you'd like to see as a candidate in the QCQAL.
2. Add a second comment if you added your fabric pulls for the QCQAL on Flickr or our link up.

The give away will close on Friday at midnight!

We are busy putting together the tutorial and making our blocks for next week! Come back and see if your favorite won!!

Sunday, March 2, 2014

Wishes Quilt Along Block #3: Annie's Choice

It's the beginning of the month, so it means it's time to binge on all of the QALs that have new blocks out!

I cut all of my pieces for the March Wishes QAL block on Friday night and got it all sewn together on Saturday night. I knew that I wanted to use the large floral with the green background as the main "pinwheel" fabric, so I chose the orange and pink weave-y wavy print fabrics as the outer triangles.


The block tutorials are all still up if you want to start yours now!

Saturday, March 1, 2014

Finished Citrus Simply Woven Quilt

While this was my February ALYoF goal, it didn't get done until March, but I can totally accept that after waiting until after the 20th to get the last piece for the backing fabric. Next time I need to double check my backing yardage calculations twice before I order.

Here's the pictures from last night when I got all of the quilting finished:


I decided to bind it in the same fabric as the backing, so this morning I machine bound it. This was my first time machine binding a quilt, and it turned out decently well. A few places are a bit wobbly and my corners aren't perfect, but I can always improve!


Here's the backing with the three leftover blocks:


Here it is on the fence at my apartment complex. I got really fancy with these outdoor shots, eh?


Stats:
Blocks: Simply Woven via Moda Bake Shop made by members of the Stash Bee 2013
Background and binding : from Haven's Edge line
Size: 72 by 72 inches
Quilting: meandering loops in white thread
Started: November 2013
Finished: March 1, 2014
Future: picnic blanket -- Park Ranger husband and I are going to have some picnics on this blanket once it warms up.