Pages

Wednesday, January 29, 2014

WIP Wednesday: Bordering on insanity

I had fully intended to do a post between the last time I talked about my Lazy Sunday Mystery Quilt and now, but that clearly didn't happen.

Since I couldn't make additional blocks, I first planned to make it twin size and to just put simple borders on the quilt instead of the pieced borders that the pattern directs. I used my light blue fabric for the innermost border and then decided that I did want to do at least one pieced border so I came up with what I think is clever:


It looks complicated, but it is just strategically colored fast flying geese units! I will hopefully have a tutorial on how to do this in the next few days!

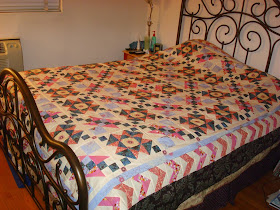
Here's the top laid out on my queen sized bed. It surprised me that the length was just about perfect!


So after consulting my quilt spirit guide (aka my husband) I decided to put 12 inch borders on the sides and a 2 inch border on the top and the bottom so that it would end up queen sized.

Here's what the corner looks like:


And here is entire quilt top!


Another one to add to the "not quilted" WIP pile.

Linking up at Freshly Pieced!

Saturday, January 25, 2014

Pins, pins, and more pins.

I hadn't worked on my 2013 Stash Bee Quilt, based on the Simply Woven quilt from Moda Bake Shop, since before we left to go home for Christmas and today I got the top all put together unless I make more blocks.


The name of the game with this one was PINS, PINS, PINS. I had to pin at 6 points per pair of blocks to get the colored strips lined up. This one, I will admit, was not the best choice to have 15 different people make a block that requires so much accuracy to be able to sew it all together without ripping one's hair out. It made for a great variety of prints and some of them came together great -- but NOT recommended as a Bee Block for future reference unless everyone has 1000% piecing accuracy.

I'm still on the fence about how to finish this one. Does it need another row of blocks so that it's not square? Does it need a border? Then of course, I will need to ponder how it will be quilted!

Decisions, decisions.

Monday, January 20, 2014

Wishes Quilt Along Block #1

Are you participating in the Fat Quarter Shop Wishes Quilt Along?

Originally, I wasn't planning to do this one, but my sister decided over Christmas that she was going to do it, and after seeing how cute her block turned out, I had to join in too!

I am using half yards rather than fat quarters and am using the pieces that I have of the Cabana Blooms collection that I got ages ago on clearance on Fabric.com. I have added in a few other fabric pieces from here and there and am using Kona Coal for my background.


January's block is the Flying Kite Block. Instead of using 8 different fabrics, I used 2 each of four different fabrics.


I will also say that I did not make my block as directed. I cut my background triangles as directed and then used them as a "template" to trim down the triangles I cut from 6 inch squares cut diagonally once (I ended up trimming off about 1/8 th of an inch). Why cut four triangles and not use three of them? Why cut a nearly 8 x 6 inch piece and discard a whole bunch of it? My block ended up perfectly sized without wasting an excess of fabric. I certainly cannot afford the luxury of over-cutting or throwing good fabric away just because it makes for a simpler pattern.

Rant over. There's a great Facebook group and a Flickr group to share progress and ogle blocks, if you so desire!

Finished Sewing Machine Cover

This project came together SO FAST!!

Yesterday, I had showed that I had the front/back piece all sewed together and ready to be quilted. I decided to FMQ loop-de-loops all over.

I made sure NOT to make my loops too small!


My machine is wider at the base than at the top, so my side pieces had to have a wedge on the front side. I found another brown in my stash to use for the front of the side pieces and also quilted loops on those pieces.


I used my walking foot to sew the quilted pieces together and the first time that I turned it all inside out, it was really big so I stitched to the inside of all of my original stitching to take it all in a little bit. The corners took a little thinking to figure out how to do smoothly (cut notches on the side pieces) but turned out decent!

Here's the shot I took right before I turned it right side out the first time. I was kind of nervous to see what it looked like!


It didn't need trimmed hardly at all (I had cut about an inch or so off from each long side because it was much wider than I needed it to be, but the length was perfect) and I machine bound the raw edge around the bottom with the same fabric that I used on the side pieces.

Here's the finished cover doing its job, or as my husband would say "a hat for the sewing machine."


Start to finish, this project took less than 3 days! It's so nice to work on a small project like this every once in a while!

PS. Don't forget that our first set of seasonal placemats is on sale on Craftsy!

Sharing at Freemotion by the River and Fabric Tuesday!

Sunday, January 19, 2014

Getting out of the box.

I mentioned previously that one of my goals this year is to continue practicing my free motion quilting. One of my other goals for this year is to continue to make projects out of my stash and vast scraps.

Friday night and Saturday I got out this bag of all of the "stubs" of the strips that I used in my Argyle quilt and started randomly piecing them together and made some scrappy slabs. 


This is really out of the box for me. I saved all these scraps because I love this fabric line. I decided that I would sash the biggest blocks together and use it as the start to my quilted sewing machine cover.


I added a few inches of brown on all four of the sides for insurance. When I measured my machine it looked like the width was perfect as is and the length was just ever so slightly too short. I figured that with a few extra inches all the way around, I can cut it down if necessary.

And yes. The sides are seriously pieced (left over from the setting triangles from the argyle quilt), but again, I'm thinking I might end up cutting all of it off, so I'm not super concerned.


The finished piece is about 24 inches wide by about 32 inches long. Right now it is all pinned and ready to be quilted (using a piece of brown from a scrap box I bought that doesn't match anything -- perfect for the inside of a sewing machine cover.)

Off to practice something other than meandering with this one. 

Friday, January 17, 2014

Finished Churn Dash Baby Quilt

Ta-da!

 Last night I finished up the last few stitches in the binding for this lovely little quilt! And that means my January Lovely Year of Finishes goal is completed too! Hooray!


After many, MANY hours of free motion quilting, this one is ready to go off to its new home.


As I might have mentioned previously, this quilt is for a college friend of my husband's and his wife for their first baby due in March. 

When I finished it my husband asked me if we could keep it or if I could make one exactly the same for him. I told him that I can make him one that's his own size rather than baby sized.


Stats:
Size: 48 inches square
Blocks used: Churn dash
Backing: Giant churn dash with borders
Fabrics: all from my stash -- a mishmash of matching fabrics.
For: Baby K due in March!

Linking up with Finish it up Friday and at A Lovely Year Of Finishes!

Thursday, January 16, 2014

Churn Dash FMQ Progress

Despite (or maybe causing) the lull around here the last few days, I've made serious progress on free motion quilting my churn dash baby quilt.

Here's a progress shot:


I made the mistake of starting out quilting this one a little on the dense side for 1. my first larger FMQ project and 2. a baby quilt. I would probably be done before now had I not started making such miniature meanders. 

Right now the center four blocks are done and the outer blocks are in various stages of being done. Here's a closer up shot of the two edge blocks that are finished and then a closer up view of the block on the left.


I've learned a lot very quickly in the span of starting this:

  • Tension! I have a scrap fabric/batting/fabric sandwich that I have been testing my tension on before each time I restart stitching or if I switch bobbins. I had to take out a big ol' section because of the MASSIVE UGLY LOOPS on the back side. I just about cried.
  • Thread breaks from the spool thread. How do you prevent these from happening? I figured out how to cover them up slightly but they make me sad!
  • I'm very thankful that my machine has a needle up/needle down option. Hallelujah!
  • At first, it was hard for me to quilt in the very light areas with the white thread. I got more used to it, but I understand why contrasting thread is often used!
  • I'm proud to say there are ZERO puckers/folds on the back thus far. After I got the center blocks quilted, I laid it out on the floor and readjusted all of my pins. The backing might not be perfectly centered anymore, but I definitely would rather have zero back puckers.
  • It didn't take me long to find a good quilting groove. There are still lots of imperfect places, but I'm really happy with everything thus far.
Hopefully I can finish up the quilting and get the binding on this weekend! (Edit: this is finished! See it here!

Happy Thursday to you!

Sharing at The Freemotion Quilting Project's Friday Link Up!

Friday, January 10, 2014

Hip to be Square Pattern Premiere and Giveaway!

The giveaway is now closed! Thanks to all who entered!

Happy Friday to you!

Honey, Bunny, and Doll is happy to share its newest pattern -- Hip to be Square!


This is a great beginning sewing pattern -- or a great way to showcase larger prints! The pattern is for a generous throw -- and is fat quarter friendly!

And you have the opportunity to win a copy of this pattern this weekend! To enter, just share your top quilt goal for 2014 in a comment -- mine is mastering free motion quilting! The contest will close Sunday at 5 PM EST.

As a heads up -- the Starburst quilt along ends on January 15th! Share your finished blocks over in the final link up to receive free setting directions! On January 15th, the individual Starburst blocks will no longer be available for free -- the full pattern will be up for sale. 

Good luck on the contest -- and as always, don't forget to share your HBD Pattern finishes on our Craftsy page!

Tuesday, January 7, 2014

Sew Kitschy January Block

I decided to join in and do the Sew Kitschy Sew Along with Kristy at Quiet Play. It's a paper pieced block of the month that is kitchen themed! It will make a lovely wall hanging for my dream kitchen someday.

Quiet Play


This month's block is the oven mitt block -- available for free for a limited time on Craftsy! (You can also purchase all of the blocks in one shot if you so desire -- but this girl likes FREE!)

I decided that my color scheme was going to be primary colors, rather than red and aqua. It's a little bit more my style -- and let's face it -- I have a lot of scraps in those colors currently! Here's my finished oven mitt block!


I pieced the thumb a little differently so that I could eliminate one of the pieces, but I don't think you can tell that in this picture.

Linking up with everyone else participating in Sew Kitschy this month!!

Monday, January 6, 2014

Churning It Out.

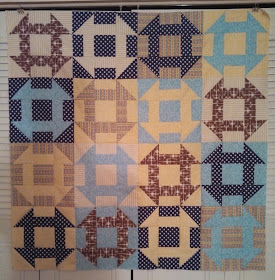
In a matter of less than 24 hours, I managed to get all of the blocks done for the quilt top for my churn dash baby quilt! And that includes trimming all of my HSTs. While that part took a lot more time, I think it was totally worth it because none of my HSTs ended up wonky (which was a huge problem in my Lazy Sunday Mystery quilt.)

Here's the top all put together:


I'm so happy with how this turned out!

For the back, I thought that I had enough of one fabric to complete the entire back, but I sadly did not. Instead, I took a walk on the wild side and made this for the backing:


Yes. That is a 42 inch churn dash, people. I used up the majority of what was left of all of these fabrics and the biggest churn dash that I could make and still have some of the tan dot print for outer borders was 42 inches finished. The outer strips are 5 inches wide -- so the backing is about 2 inches bigger than the top all the way around.

Here it is all layered and pinned -- ready to be quilted!


It's so liberating to not have to buy fabric to finish a project and to pull every bit of fabric used from my shelves! I did have to buy white thread to be able to free motion quilt this one on my own. Yes. I am going to FMQ this thing myself.

That's one of my quilting resolutions this year -- to learn to FMQ and to finish more of my own projects myself and to have 100% completed by me. I still have no problem having a long arm quilter doing my big projects or special projects, but things like baby quilts I can totally learn to handle on my own. Anyone with me on this??

Sharing at Linky Tuesday at Free Motion by the River!

Saturday, January 4, 2014

ALYoF January Goal

I'm finally back participating in 2014's edition of A Lovely Year of Finishes!


This month I am working on a baby quilt for college friends of myself and my husband. Since we don't know if they are having a boy or a girl, I picked this group of fabrics to make a churn dash quilt.


I didn't have much of the brown chandelier print left, so I went a head and used up that fabric first. I plan to make this one 4 blocks by 4 blocks without a border. Here are the ones that I have finished thus far!


If you haven't linked up your January goal yet, there's still time to do so! Also, Honey, Bunny, and Doll Patterns is now a sponsor of A Lovely Year Of Finishes -- so every month one winner will be receiving two of our patterns!

Thursday, January 2, 2014

Diamond Fire kits available now!!

Since HBD Designs premiered our Diamond Fire pattern, we've gotten a number of requests for quilt kits to go along with the pattern. We are happy to announce that we now have kits available on Etsy!


There are two options available for purchase:

  • The quilt kit contains all of the charms squares needed as well as enough background fabric to complete the quilt top and for the binding.
  • The charm square kit contains only the charm squares if you'd like to use your own background fabric.
Both kits include a PDF version of the pattern that will be emailed to you once payment is confirmed.

Wednesday, January 1, 2014

New Year, New Fabric!

One of my favorite part about getting back home is going shopping at a real quilt store or two. And my mom's stash, too!

My mom and sister bought two boxes of surprise fat quarter assortments from Craftsy a while back for us all to share. This is my loot:


That's more than 20 fat quarters from Allison Harris' Wallflower line! I saw it and was so excited! I haven't decided what exactly I'll be using this for, but I am thinking some sort of a sampler quilt. Let me know if you have other ideas. :)

While I didn't buy this, I am very excited about this! My sister made this as a test block for a pattern she is currently working on and gave me it to use on the back of my stash bee quilt! The colors are perfect!


We were able to go to the best sale ever at my favorite quilt store ever (The Quilt Patch in Tecumseh, MI) and I got the backing for my Starburst Quilt (that I showed off here) and also got some half-yard and yard cuts for future projects as well as an AWESOME scrap bag for $5!! How cool is the fussy cut scrap on the top of the bag?


My husband also indulged my quilt obsession and we stopped by the quilt store near his mother's house (Quilts and Sew Forth, Mentor, OH) and I got a discounted strip pack and the end of three different bolts for stashing! All three of those fabrics are just so lovely together, I might not be able to separate them.


Hopefully Santa and sales brought new fabric to all of you this holiday season! I'm still planning on hoarding Bungalow so if you see any that's on sale, let me know!

2013 A Lovely Year Of Finishes Round Up!

Because my fall was absolutely nutty, I didn't enter any ALOYF monthlies from September-December, but I did complete six months worth of finishes to be able to enter for the grand finale!


I'm going to be posting my January goal once we get back to Pennsylvania later this week when I can take pictures of the fabric I will be using!

Happy New Year to you!